Learn how to migrate your WordPress website in cases where you have to use the cPanel of different hosting providers – cPanel to cPanel WordPress migration.
When you run a website, sooner or later, you will face the need for migrating it to a new host. Some reasons for that are pleasant; some are not.
Be it business growth, the popularity of your personal blog or escaping from a faulty hosting provider, at some point, you will have to consider migration to a new cPanel account to a new hosting.
Let’s make this process as smooth as possible, taking into account all the nuances:
Planning WordPress Migration
The majority of migration tutorials start with describing the process, but that’s not what we would suggest starting with.
Before playing with the files, make sure that your old hosting account is still active and you have at least a day before expiration to avoid downtime.
Search for activation codes for paid plugins and themes. Some of the providers secure their products so that you will need to enter the license key or a purchased code, so it’s better to keep them at hand to avoid extra stress.
Finally, don’t forget about SEO. Make sure to note all the core links on your website and perform a crawling search to measure the results for later comparison.
Choosing Right Migration Options
When you are looking for ways on how to migrate your WordPress you will definitely see the battles arguing what is better: to do the manual transfer or use a one-click plugin.
You can use plugins such as Duplicator (see how easy it is to migrate WordPress using Duplicator plugin) or others to move everything automatically.
If you decide to go with the automatic plugins route, please check to see if these WordPress migration plugins are suitable for your needs.
Once you have decided, Manual WordPress migration is the right option for your case, follow the steps below.
WordPress Migration cPanel to cPanel
While migrating using plugins is an easier way, sometimes it will not work due to certain limitations of the server, or the website might be just too big to be transferred automatically.
In such cases, you might want to look for options such as the cPanel to cPanel WordPress migrations.
The WordPress migration cPanel to cPanel process consists of two major steps – i) file migration and ii) database migration.
Let’s look at both of the steps in detail along with typical cPanel screenshots to guide you with the migration.
Migrating Files from old cPanel
To perform the file migration you will need to go to the cPanel > File Manager menu > locate the directory of your website (for the main domain it’s public_html by default), then select all the files and select the ‘Compress’ option.

Then you will be able to choose the compression type.
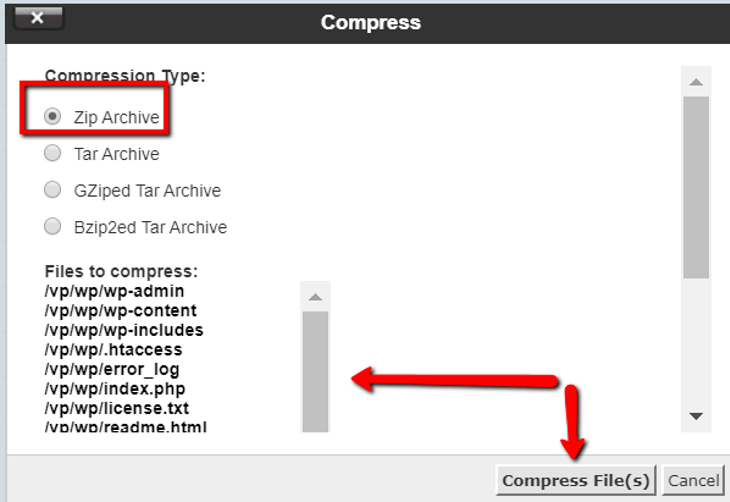
At the compression type, choose the desired option.
We prefer .zip as it does not only gathers the files in one folder but also compresses their sizes so that it’s lighter and can be uploaded to the new host easier.
Once done, let’s move on to migrating the databases.
Migrating Databases from old cPanel
First, you need to find out the database name assigned to your WordPress.
It can be done by going to your File manager > Website folder.
It’ll be public_html for the main domain or a website name folder in the home directory by default.
Open the file wp-config.php (remember this one, you will need it later).
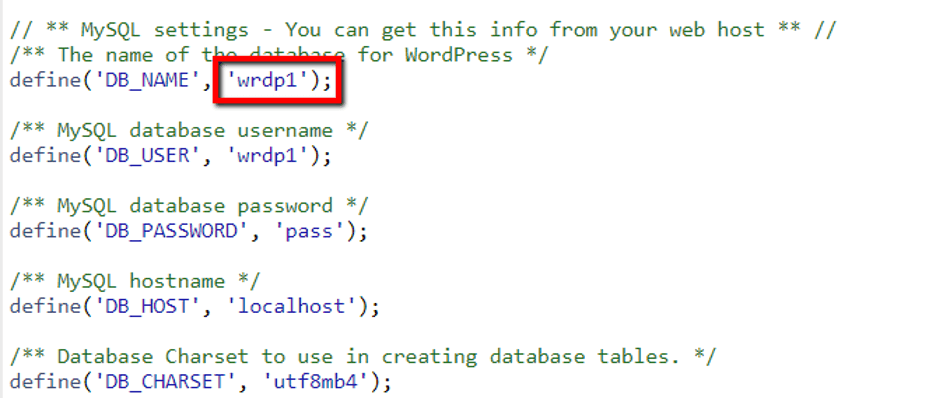
Then, navigate back to the main cPanel menu > PHPmyAdmin

Once there, click on the name of your database that you figured out in the earlier step.

In a new window сhoose ‘Export option’ from the upper panel:
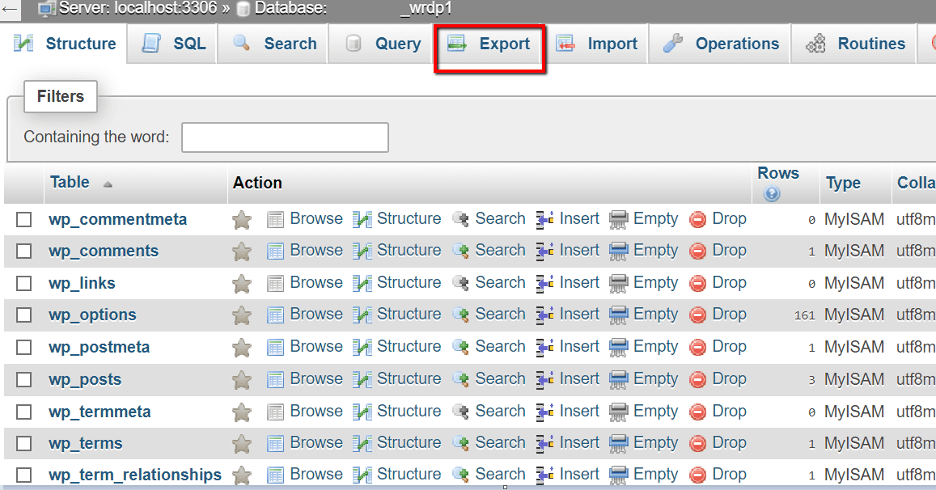
On the next page, you can choose the export method and format (in this case we leave the default option here).
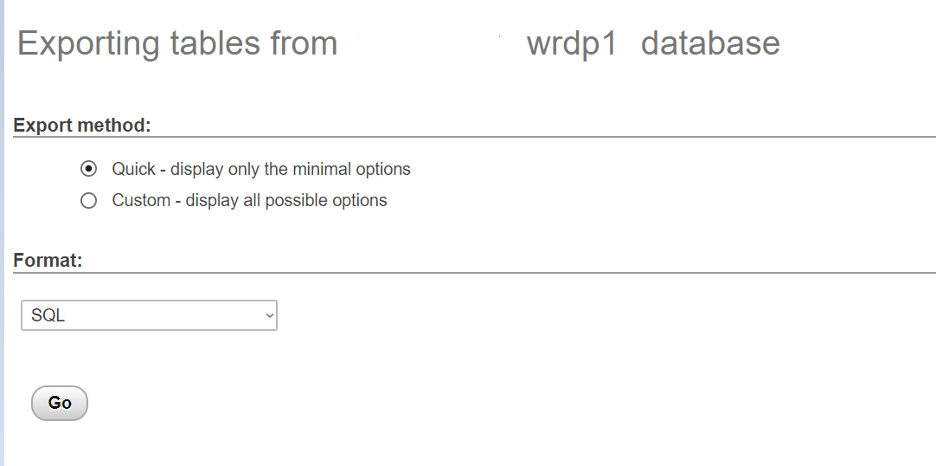
That’s it, the database is exported and you are ready to move on to the new host.
Transferring to New Host
With the files and database being exported from your existing hosting, let’s move on to transferring them to the new hosting provider.
Importing Files to new cPanel
The first step is to Upload and Extract the Archive to the new cPanel of your hosting provider.
Make sure to upload the archive with your data to the cPanel > File manager > the directory of your website, select the archive and extract the files.
You can do it both directly using cPanel or if the file is very big, you may turn to SSH or FTP options.

Click on the Extract once you have uploaded the archive.
Additional Step: Create Addon Domain
Extra tip: If you are moving a website to a cPanel where there already are living websites and it’s not set as the main domain for the account, you will need to add this domain in the cPanel > Addon domains option. In this case, the directory for the website (also known as Document root)

Importing Database to new cPanel
Now, as in the previous step, you will need to create a new database, username, and import your database.
Go to cPanel > MySQL databases menu > Create New Database

Once done, scroll a bit to the section ‘Add New User’:

Then connect the new user to the new database that you created in the above steps.

In the new window, select the option “All Privileges”:

After, go to the cPanel > PhpMyAdmin > select your new database and choose ‘Import’.

At this stage, from the files to import select the database that was downloaded during our earlier export stage, press ‘Go’ and wait till the import is finished.

In our case, the default options of “Import” work fine, but sometimes it may happen that you need to tweak them. i.e. if you used a different control panel or SQL system but in order to play with these settings some learning of SQL basics is required.
Make sure to remember the database name, database user and password as you need to indicate these details in the configuration file.
Once done, it’s time to indicate these details in the wp-config.php file.

That’s it!
Final WordPress cPanel Migration steps
Once done, you are probably hurrying to switch the DNS for your current website and enjoy your new website.
Don’t rush! Make sure to examine your wp-config.php and .htaccess files to look for the remains of old paths. Some plugins, e.g. cache ones can add them automatically for easier interaction.
Here’s how it looks:

Delete the string or replace the path with the actual one using the new path.
It can be found near the upper home icon and the very home directory path can be found in the directories list below. i.e. in this case our directory is home/example/public_html/test.

Also, check how the website is resolving from your new hosting. To do so, you can either locate the ‘hosts’ file on your PC or Mac and insert the new IP address for your website.
As an alternative, you can use some free virtual hosts file, where you just have to enter your cPanel IP address (available in the right-hand panel when you log in) and your domain name.

Only when you make sure everything is correct, you may switch the hosting records to make the website live in the new account.
Once you switch the records, they need to propagate but don’t worry, there will be no downtime as some users will see the page from the old hosting while the other from a new one.
Last but not least, although it’s possible to delegate the migration to specialists, make sure you inform them about all the settings that need to be taken into accounts.
This might include information related to your plugins/themes activation codes, peculiarities of image optimization, correct permalink structure (so that if it switches to default during the transfer, a specialist can quickly revert it back), custom redirects and other crucial details that matters.
Save these instructions to rest assured you are ready for your next WordPress migration!
Written by Stewart Dunlop of Udemy and edited by the WPism team. You can find several WordPress related courses on Udemy.
