Learn how to move WordPress website to a new host in this detailed guide.
If you are not happy with the current hosting of your WordPress website, you might be looking to move to a better or faster hosting provider.
Moving a WordPress website or blog to a new host is a real pain. Besides being a time-consuming process, there are several technical considerations for doing it in the right way.
I will walk you through the detailed steps you need to go through to move your WordPress website to a new host in this guide.
Steps to move WordPress website to new host
Here’s a quick overview of the steps required to move your WordPress website to a new host.
- Find a new WordPress hosting where you want to move your website.
- Create a backup of your WordPress website.
- Install Duplicator plugin to create required packages from your existing website.
- Upload the packages to your new hosting using FTP.
- Create mySQL Database and User with your new hosting Cpanel.
- Change your Local Host file to point your domain to the new host if you want to prevent downtime.
- Browse to the Packages file on your server and launch the installation process after completing the required database details.
- Change the domain name servers of your current domain to point your WordPress website to new host.
Follow the tutorial below with detailed instructions to move WordPress website to a new hosting.
Step 1: Choose a New WordPress Host
The first step in the process is to find a new host for your WordPress website. If you have purchased a new hosting plan already, feel free to skip this section.
It’s very difficult to find the best hosting suitable for you when you are starting a blog for the first time. As the blog grows, hosting needs change and it’s time to start looking for a host as per your requirements.
If you are still in the process of deciding, you can follow my recommendations depending on your hosting needs. You might also want to look for a host that can help you with the free transfer if you find the process really technical.
If you are still at a beginner level, I would recommend Bluehost hosting, one of the officially recommended WordPress hosts. This is the most cost-effective solution for choosing a new host (Exclusive Bluehost coupon for WPism readers).
You can also get a free website migration from Bluehost, helping you navigate through this entire transfer process for free.
On a mid-level range, I recommend going with Siteground. They also provide free website transfer if you find the process complicated. The promotion however only includes moving a single website or a complete cPanel account migration.
You can also choose to move to Managed WordPress hosting services like Kinsta and WP Engine, which makes it really easy to install and import your content from a previous WordPress website.
Because of their higher pricing, most of the managed WordPress hosts can also afford to provide the free website transfer service.
This tutorial can be useful in cases of moving to a new WordPress host where you will have to migrate yourself.
Step 2: Create a Backup Package for your WordPress Website
Although there are few built-in options to export and import content and media in WordPress, it doesn’t help with the complete moving process.
Luckily, there are some excellent WordPress plugins that can help us with the process in an efficient way.
Install Duplicator WordPress Plugin
We will use the Duplicator Plugin in this tutorial (check to see if you need the pro version). Duplicator is one of the most popular WordPress migration plugins that help to move, migrate, or clone WordPress sites between domains or hosts.
Download and Install the Duplicator plugin from the WordPress repository.
Also, check out the Duplicator Pro version if you need additional options or if the free version of the plugin doesn’t meet your needs.
Go to Plugins > Add New and Search for Duplicator. Install and Activate the plugin on your current WordPress host.
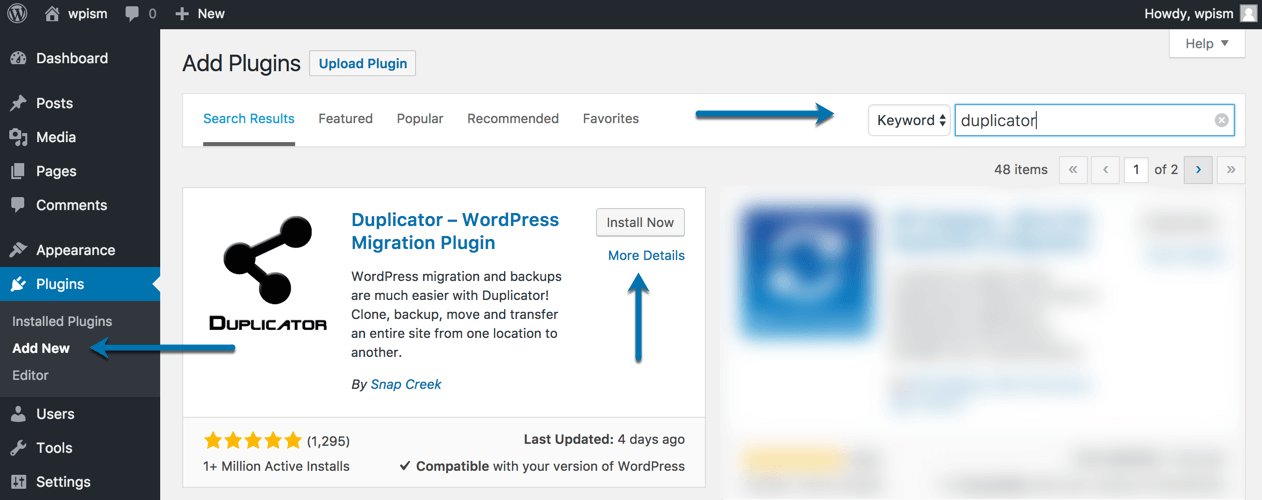
Create a Package of your WordPress Website
Once Duplicator is active on your WordPress website, you will need to create a package of your WordPress website using the plugin.
Package with Duplicator is a term for two files that the plugin will create by bundling your website files. Duplicator will create Installer.php (file that you will use to install the site) and Archive.zip (file that contains all site information including the database.)
Go to Duplicator > Packages from your left menu bar on the dashboard. You will see a message saying No Packages Found.
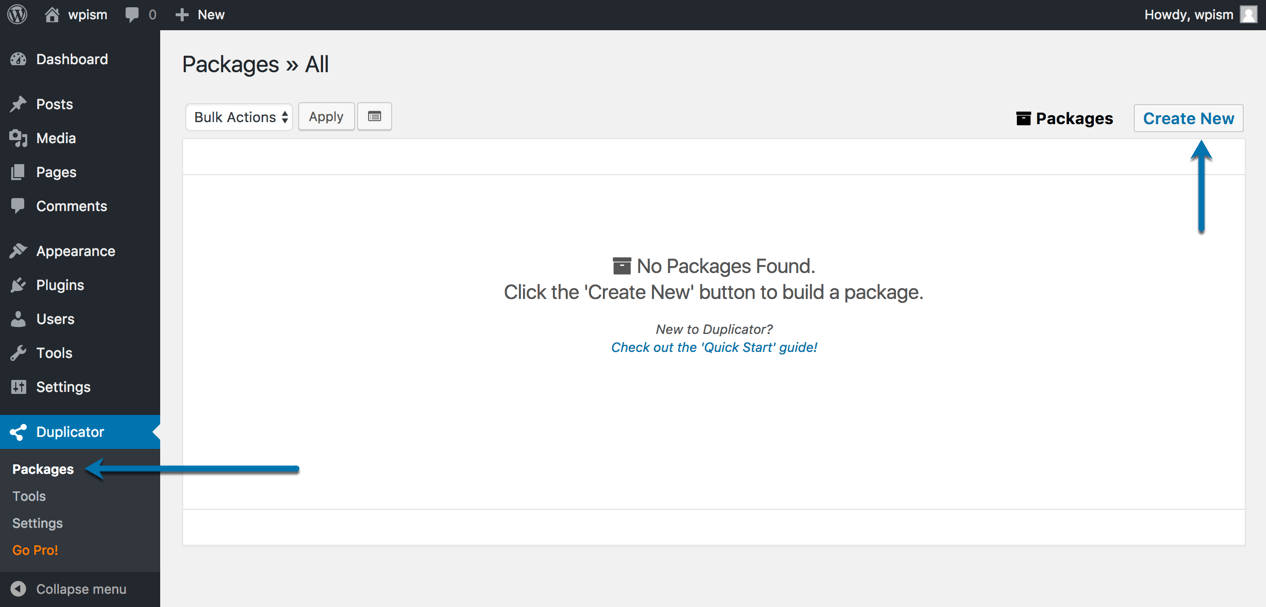
Click the ‘Create New‘ button on the top right to start building your package.
There are three stages of building your package, and you will see the first stage “Step 1: Package Setup” screen.
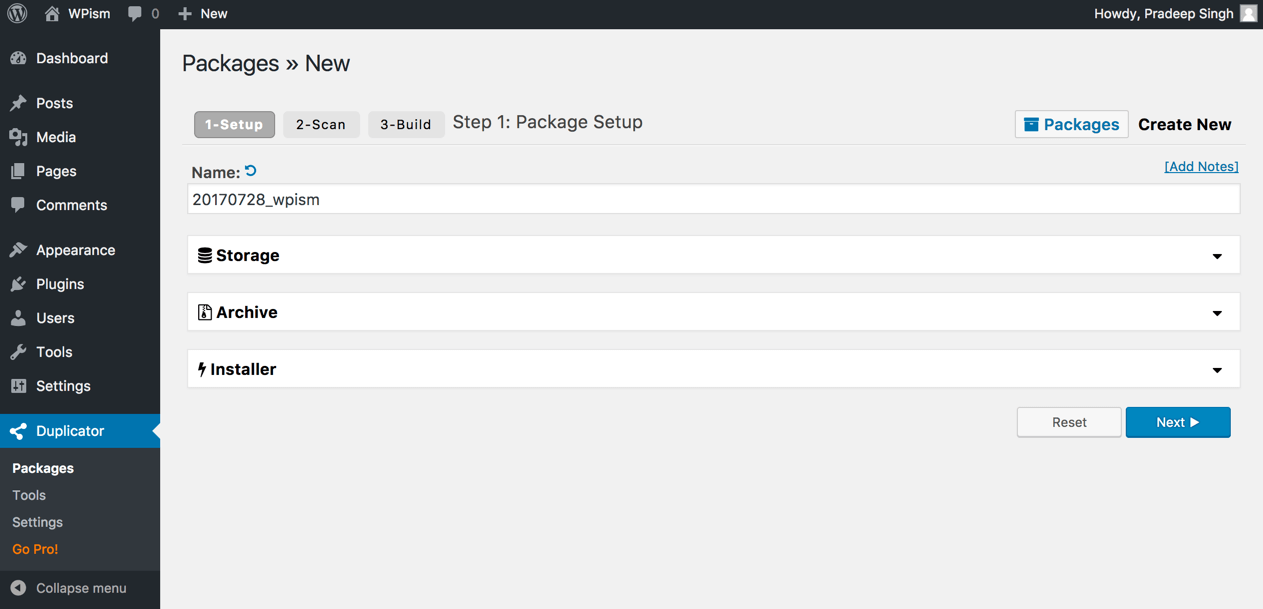
First stage – Step 1: Package Setup
You don’t need to change any of the values but here’s what you should know about the fields if you want to customise it.
- Name: Package file name
- Storage: Where you want to store the file
- Archive Files: Select the files that you want to include in the package archive
- Archive Database: Select the database tables to include in the package archive
- Installer Presets: Preset that you can specify for the Installer file so that it will be populated during the installation. (These fields are optional, and you can fill them during the time of the installation.)
Fill in the required fields and click the “Next” button to continue.
Second Stage – Step 2: System Scan
The plugin will scan your WordPress website based on the parameters you defined in step 1.
The scan looks to see if the package creation can proceed smoothly. Some warnings can cause issues while building your package.
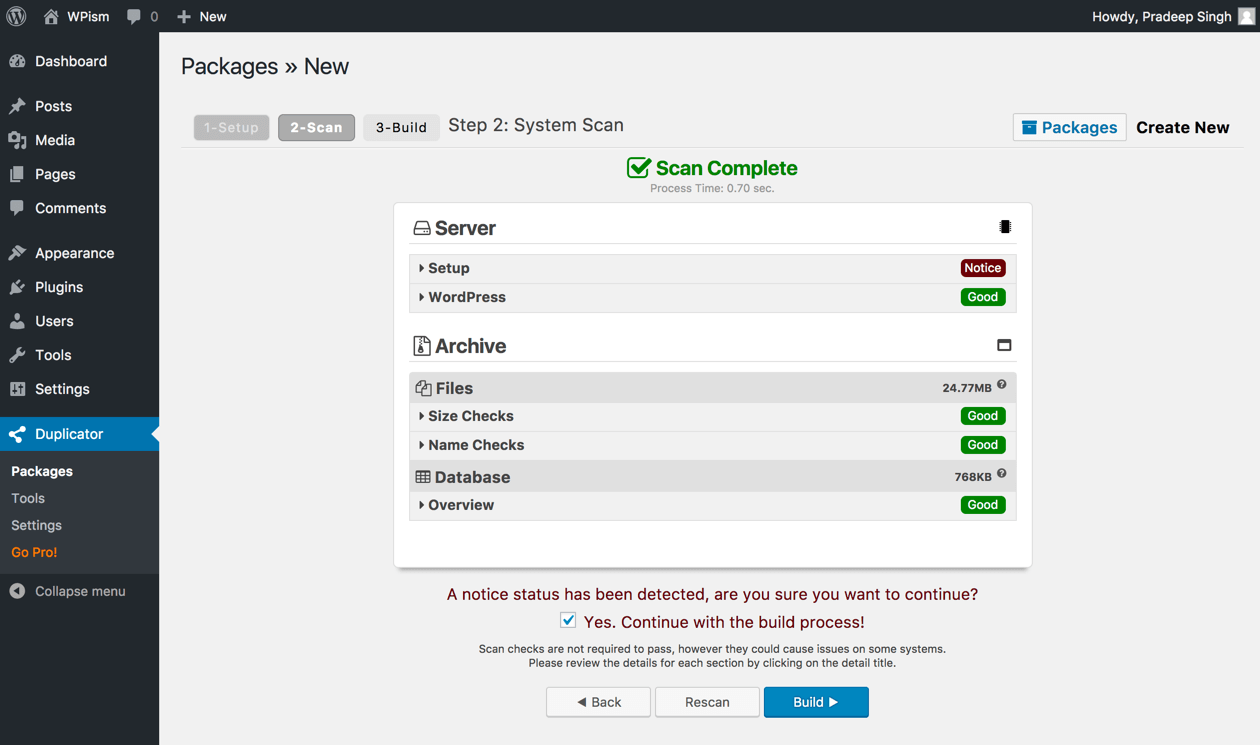
If everything looks good, click on the Build button to continue.
Package Setup for Large Websites
If you have a large website with thousands of media files and see size errors in step two, it’s likely that the Duplicator might not be able to create archive files for you.
The best workaround is to exclude [wp-uploads] folders from the archive files. You can manually download the Uploads folder from the existing host and upload the folder in /wp-content once you have moved your website.
To exclude the Uploads folder, expand the Archive tab and Enable File filters. Enter the path to the Uploads folder in the box or simply click on [wp-uploads] link on top of the box and Duplicator will enter the path of the folder for you.
Third Stage – Build Stage
The third step is the build stage. The plugin will start working to create the Installer and Archive files.
This can take a bit of time depending on the size of your website files and your current hosting. It can usually take a long time if your website is on cheaper shared hosting plans. Just wait for the process to finish.
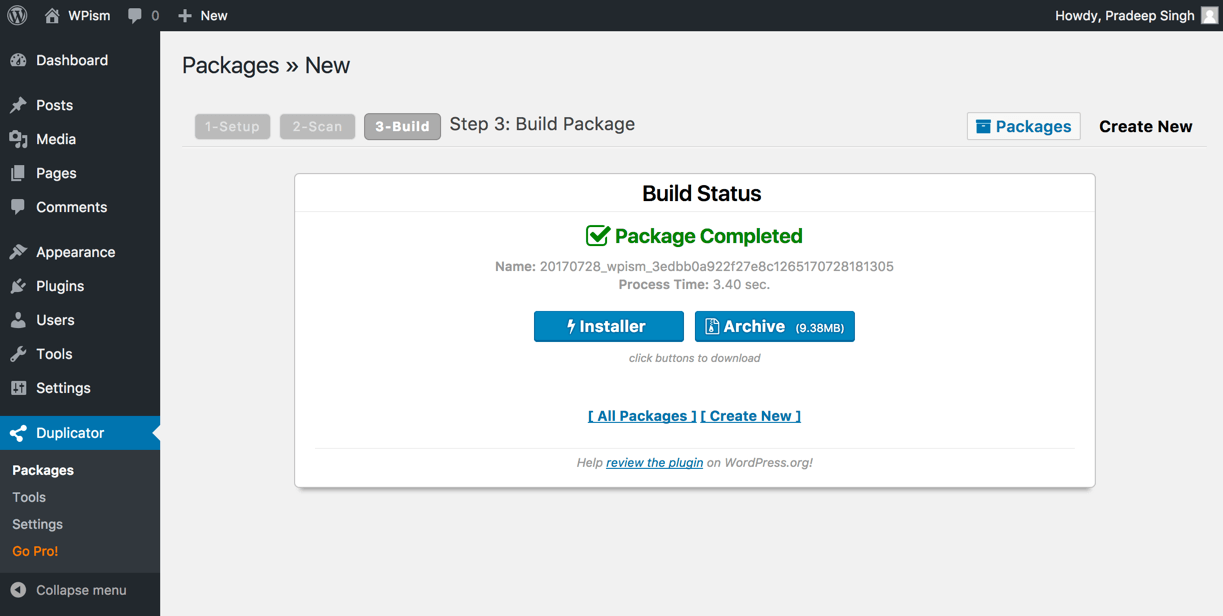
Once the build status is complete, you can click on the buttons to download and save both Installer and Archive files to your local drive.
Step 3: Upload WordPress Backup Files to New Host
Now that you have downloaded both Installer and Archive files, you will need to upload them to your new host.
You will need the FTP details of your new website to upload the files. Check with your hosting company to get the FTP details.
If your hosting provides you with Cpanel access, this is usually easy to locate. If you followed Step 1 to sign up for Bluehost, this is where you can find your FTP details.
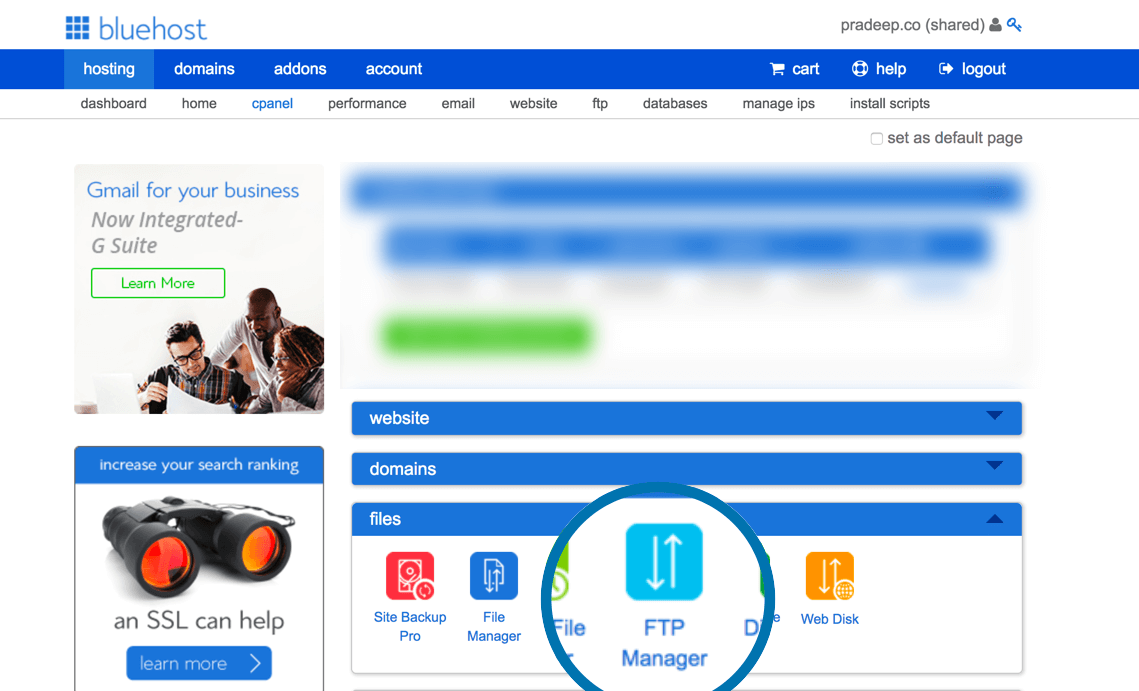
You can use a free FTP client like FileZilla or Cyberduck and enter the login details to connect to your new hosting.
Navigate to the folder you want to move your website to the files directory. You can also create a new folder, usually within the public_html directory.
Step 4: Create MySQL Database and User
You should now create a new MySQL database and user, required for your WordPress website. Although this looks really complex for beginners, there’s a useful tool in your Cpanel that makes it easy to follow this step.
In your Cpanel, find the MySQL wizard that will guide you through creating a new MySQL database and a user that has access to that database.
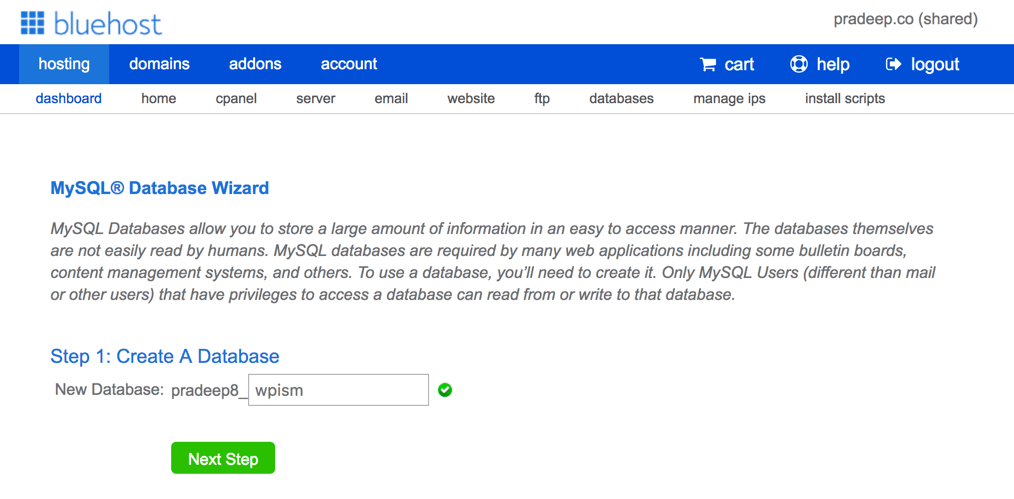
You will need to make a note of these three values from this process.
- MySQL Database name
- Database Password
- User
Copy these values and hold on to them. We will need them in the later stage to complete our installation.
Step 5: Change Local Host File Temporarily to Point your Domain
This step is optional but it will help you prevent downtime for your website.
You will need to edit your local host file to temporarily point your domain to the IP of the new host. Doing so will keep your website online during the entire moving process.
If you cannot manage to do this step or can afford a bit of downtime for your website change the A record for your domain to point to the new hosting.
If you immediately change the IP address to new hosting, you will need to wait for some time for your domain to point to the new IP.
Follow the steps in Step 7 to skip this step.
But again, the process of temporarily pointing to the IP of new hosting isn’t that complex if you accurately follow these steps.
Open Local Hosts File
You will need to find your local hosts file and this can be different depending on your operating system.
For Mac Users
Open your Terminal app and use this command to edit your hosts file:
sudo nano /private/etc/hosts
The command sudo gives you administrative privileges and nano is the editor you will use to edit the file within the command-line interface.
For Windows Users
You will need to edit the hosts file located at –
C:\Windows\System32\drivers\etc.
Open it with your notepad editor (You will need to run the notepad as administrator)
Add IP Information to Hosts File
Once you have opened your hosts file in an editor, it’s time to make changes to the file. Edit the file to point your domain temporarily to the new hosting IP information.
You will need to add line at the end of the file in the form of – your-ip-address your-website-url
let’s say, if your new hosting server IP is xxx.xxx.xxx.xxx, you will need to add it in this format;
xxx.xxx.xxx.xxx yourwebsiteurl.com
Make sure you save the changes after editing the file.
Flush DNS for Windows and Mac
After changing the hosts file, you will need to Flush the DNS of your local machine so that your website URL points to the new hosting server IP.
Flushing the DNS resets the local cache of DNS queries saved by your machine. This again has different steps depending on the operating system – Windows or Mac.
For Windows Users
This can be done easily on Windows using the default command program. To open Command Prompt window – click Start, All Programs, Accessories, Command Prompt.
With administrator privileges and enter the following command.
ipconfig /flushdns
For Mac Users
For Mac users, this can be again slightly different depending on the OS software that you are using. Use the following terminal commands for your OS software installed on your Mac.
OS X Yosemite and later
sudo killall -HUP mDNSResponder
OS X Mavericks, Mountain Lion, and Lion
sudo killall -HUP mDNSResponder
Mac OS X Snow Leopard
sudo dscacheutil -flushcache
For the latest and more detailed instructions to flush DNS on your Mac, follow this official help article on Apple’s website.
Step 6: Start Installation On your New Hosting
Now that you have ensured your domain is pointing to the IP address of the new hosting, you can launch the installer.php file that you uploaded earlier.
Step 1 of 4: Deployment
Browse to the Installer File – Go to yourwebsiteurl.com/installer.php to start the installation process.
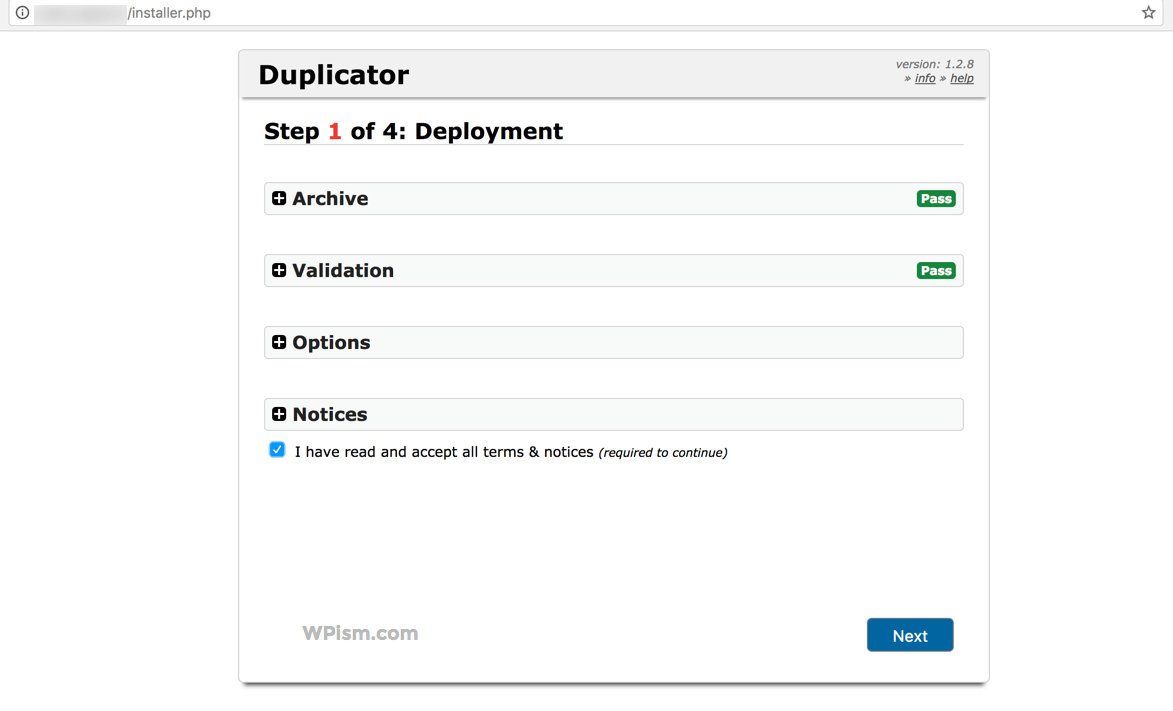
Agree that you have read and accepted their terms and notices and click on the Next button.
Step 2 of 4: Install Database
Enter MySQL Database and User Information from Step 4 above: You will need to enter the MySQL Database name, password and user name on this page.
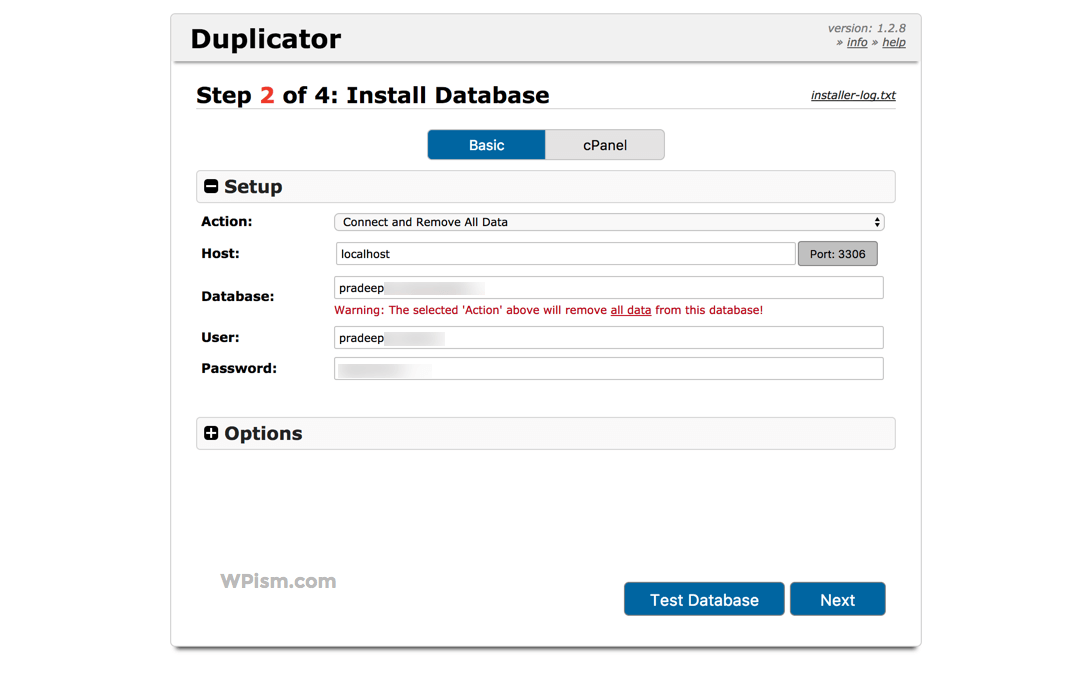
Enter the details and click on the Next button to continue.
A prompt will ask you to confirm the settings with the details that you entered above – “Run the installer with these settings?”
Step 3 of 4: Update Data
Your blog data should be filled here automatically. Only make changes if you know what you are doing.
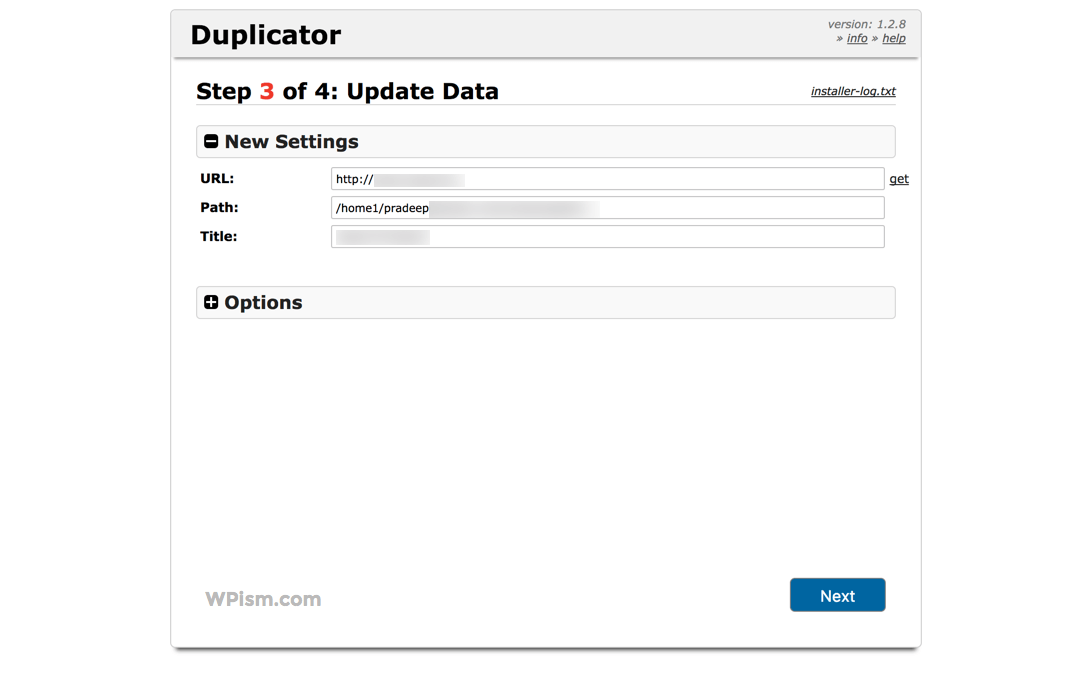
Make sure the title and your website URL appears correctly and click Next to continue with the installation process.
Step 4 of 4: Test Your New Setup
Login to your WP Admin section to finalize the setup and remove the installation files.
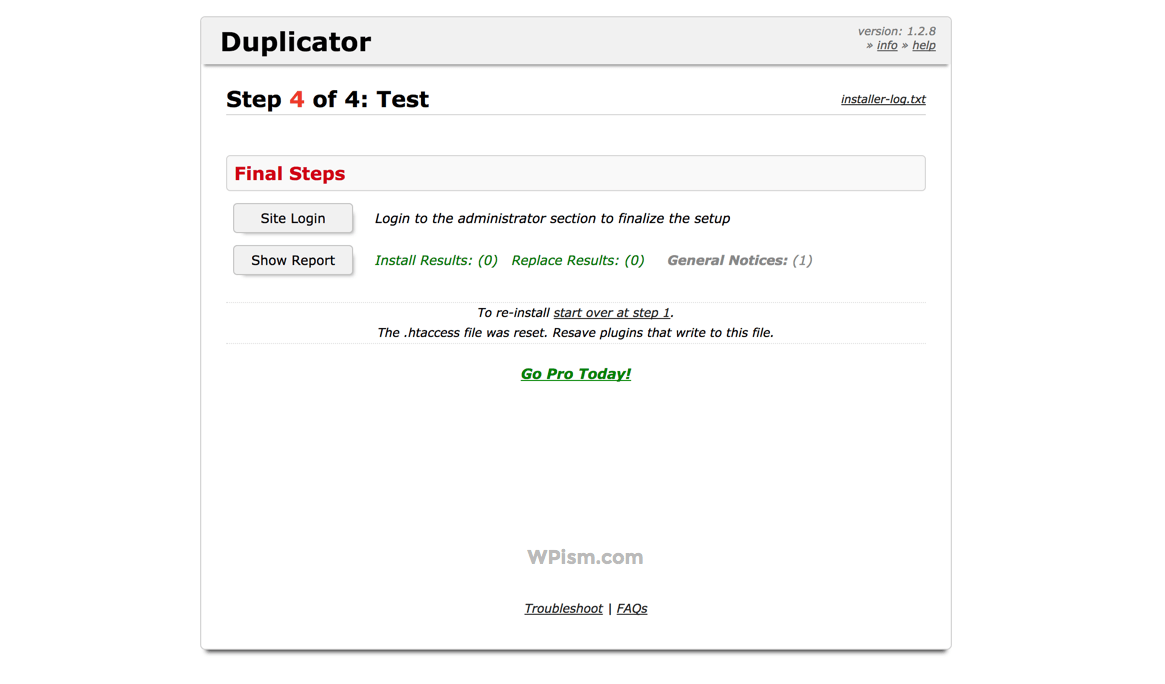
Click on the Site Login button to login to your new transferred website. You will need the enter the existing login details for your WordPress admin.
You should be redirected to the Tools page of Duplicator to do some cleanup of the installation files. In some cases, you will see this notice and need to click on “Take me there now”.

Once you are automatically redirected to the Duplicator tools page, you can simply click to remove the installation files and clear the build cache under the Cleanup section. This removes the installer.php and archive files that you uploaded during the installation process.
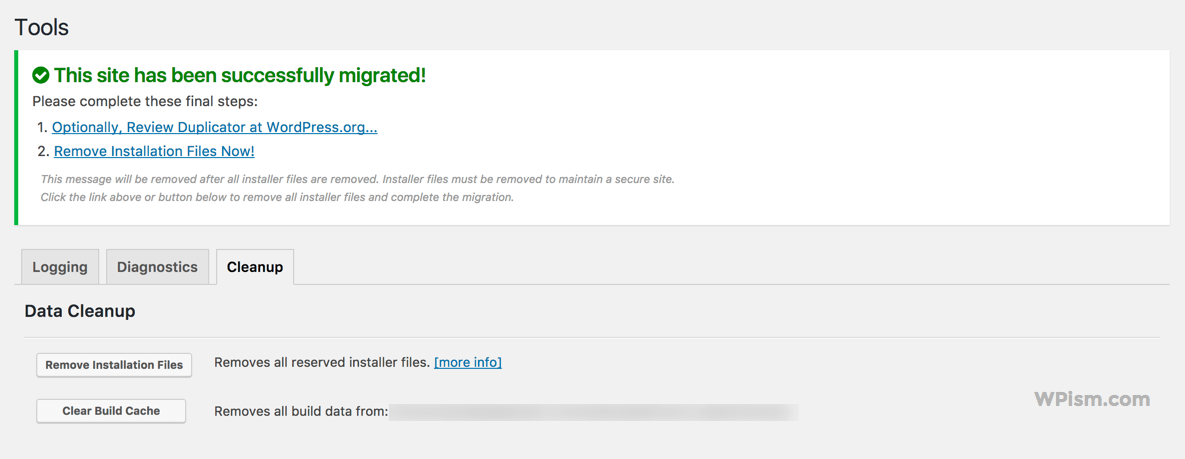
Congratulations! You have successfully migrated your website to a new WordPress hosting. If you haven’t updated your DNS of the new domain to point to your new hosting, continue to follow the last step below.
Step 7: Update your Domain Name Servers Information
If you haven’t updated your domain name servers yet, and simply changed the Local Host file to point to your domain, you can now verify that your site looks good and proceed with this step.
You will need to login to your domain registrar account and make the DNS changes. Go to the Manage DNS section of your domain settings, and you will see an option to edit the A record.
Copy the IP address of your new hosting from the Cpanel account and edit the A record for your domain to point to this new IP address of your hosting.
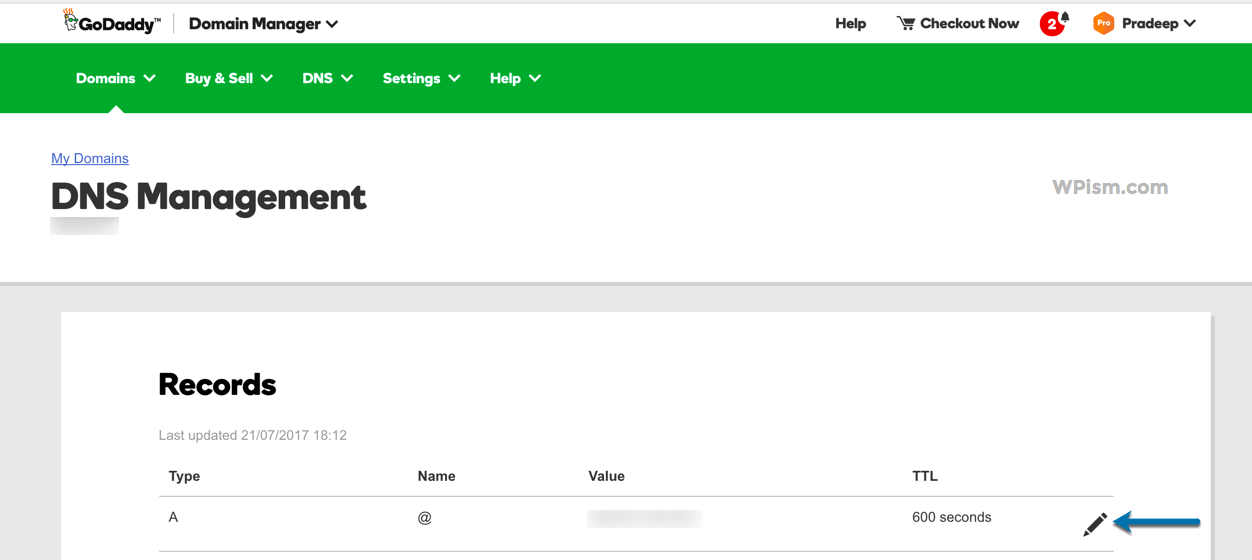
Wait for the DNS changes to propagate, and your site on a new hosting service will be live to everyone!
Summary – Moving WordPress Website
Moving WordPress website is definitely a tedious task and requires some technical knowledge. I hope you are able to move your WordPress website following this detailed guide.
If you are looking for a solution to move your WordPress website without using any plugins, please check out our complete guide to migrate WordPress cPanel to cPanel between the hosts.
If you have any questions related to the WordPress moving process, let me know in the comments below or feel free to contact me and I will be happy to help you.
Hello Pradeep,
Awesome post over here 🙂
This has been a question for many of the bloggers, what if they are not happy with their current hosting facilities, or they want to move on something better wordpress host. What will happen to their data and how it could be done?
Great step by step tutorials by your side would be of great help, for those who were willing to get it done.
Thanks for the share.
Shantanu.
Excellent resource for newbie developer but I was curious about what if the website size is more than 2 GB? I have hosted my site on shared hosing account and now I am planing to move it on managed cloud hosting platform like Cloudways or may be Siteground. Which plugin do you suggest should I use?