

Learn everything about the WordPress theme screenshot in this complete guide. Continue learning about other beginner topics in our complete WordPress guide.
If you are into WordPress themes development, I am sure you have had to look up this recommended name, format, and size of WordPress theme screenshot a few times.
The current and updated recommendation for the correct WordPress theme screenshot size is 1200×900px. The screenshot should be named screenshot.png, and uploaded to the top level directory.
I often find myself searching for the theme screenshot size, sometimes just to make sure I get it correct.
So, this is just for my own reference, but feel free to bookmark and use this page if it’s handy for your WordPress development needs.
Here are all the quick details that you need to know about the WordPress theme screenshot.
Recommended WordPress Theme Screenshot Size
According to the WordPress Codex for theme development, the recommended theme screenshot size is 1200px wide by 900px tall.
Please note some websites still mention the old low resolution recommended size of 880 x 660 pixels. This has been recently updated in the WordPress codex to reflect the new recommended size of 1200 x 900 Pixels.
The codex also mentions that screenshots are usually shown in a smaller size, but the higher resolution of the image allows for viewing on HiDPI displays.
Also, please note that as the screenshot is shown on the responsive Manage Themes screen, the top and bottom parts may not be fully visible. It is, therefore, recommended to keep your main graphics centred in the image.
Theme Screenshot Name: screenshot
WordPress theme screenshot is probably the easiest to remember. Just name it a ‘screenshot’.
I know it’s easy to get confused, but always remember it as a screenshot rather than associating it with other alternatives such as an “image”.
Theme Screenshot Format: .PNG
Another thing to care about the screenshot is the format you will need to save your WordPress theme screenshot.
The recommended theme screenshot is in .png format.
While other formats .jpg, .jpeg, and .gif can be valid extensions and file formats for the theme screenshot; they are not officially recommended by WordPress Codex.
As for taking the screenshot, you can either have a professionally designed one or use the built-in functionality of your computer to quickly come up with an image and upload it as a screenshot.
You can also use tools like Google Chrome screenshot extensions, but that might not be the best way to do it!
Upload Screenshot to Theme Folder
For beginners who want to change the screenshot of your theme (as displayed in Manage Themes screen in your WordPress dashboard), you can create a screenshot file as recommended above and upload it to the theme directory.
You will need an FTP program like Filezilla or Atom, and your FTP login details.
After you have logged in using the FTP program, navigate to the active Theme directory and upload the screenshot.png file.
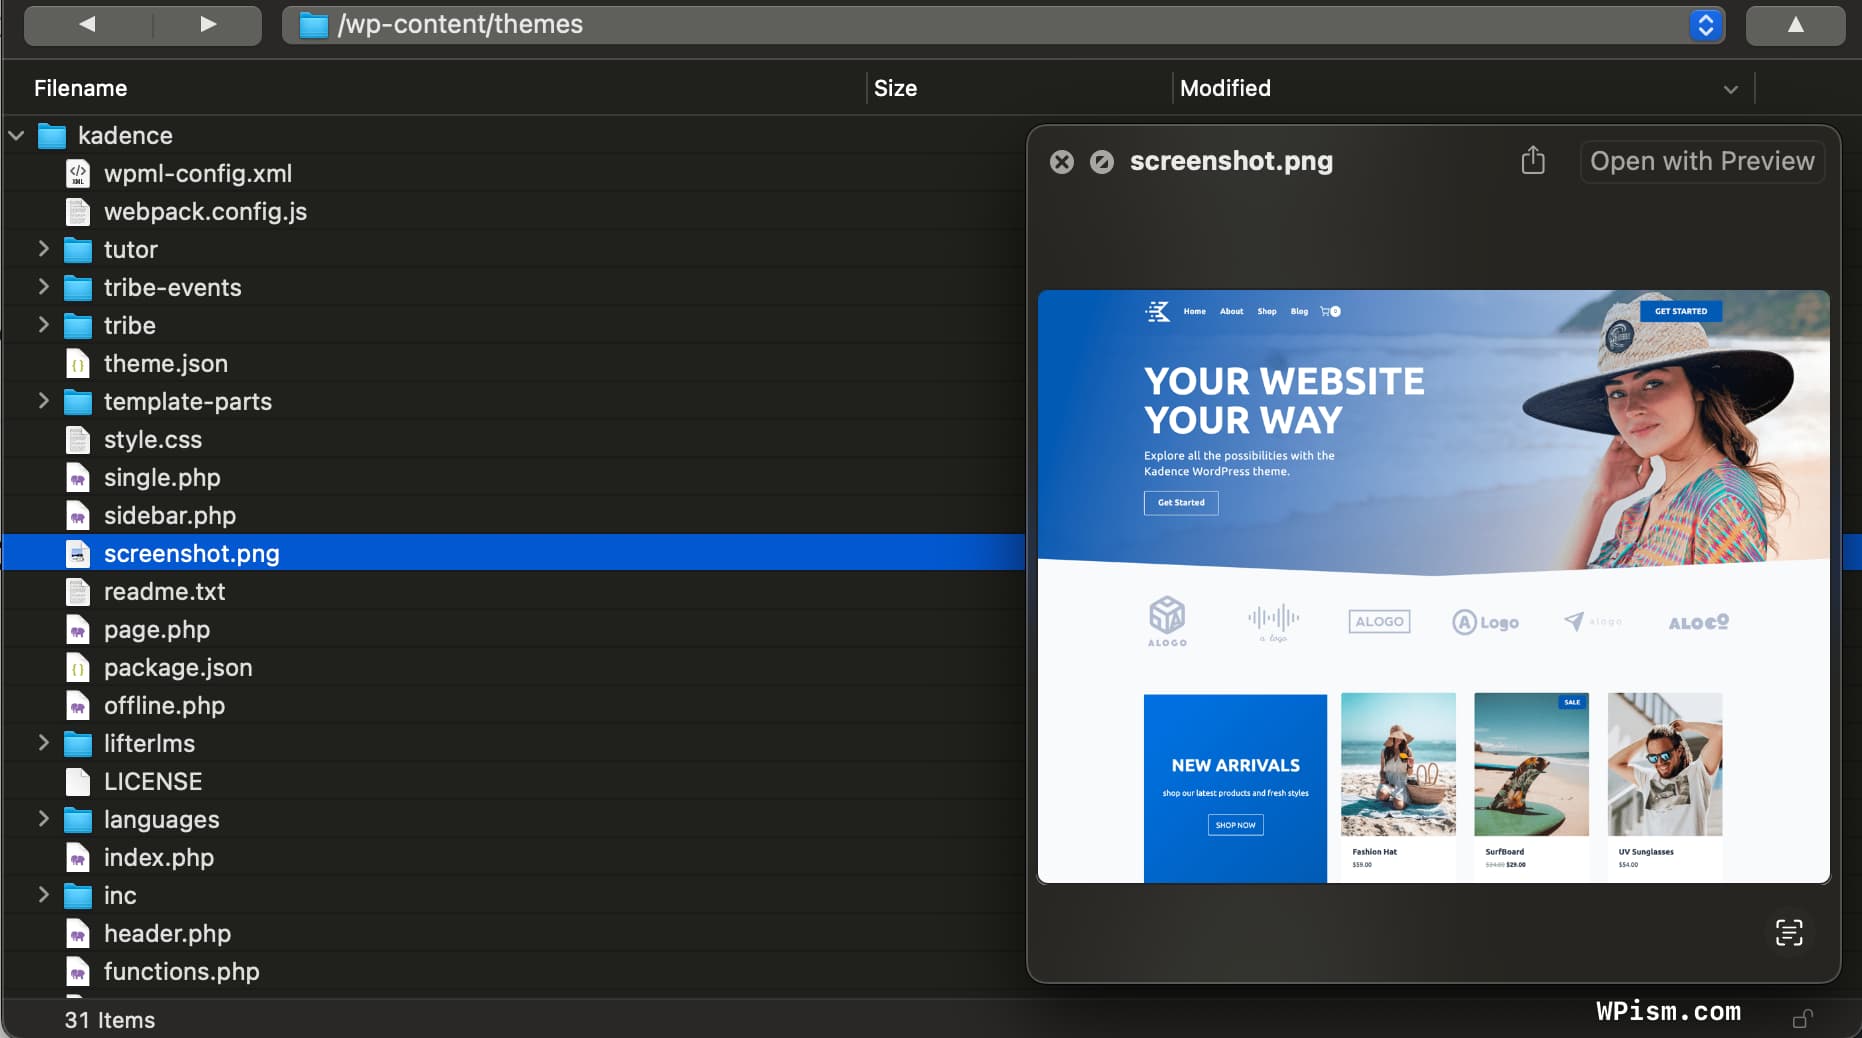
As you can see in the above screenshot, the Kadence theme has screenshot.png file within its main theme folder.
You might need to replace the existing screenshot file if one exists already.
FAQs for Correct WordPress Theme Screenshot
Here’re some of the top questions asked relating to the correct size of the WordPress Theme screenshot.
What is the size of WordPress theme screenshot?
The recommended WordPress theme screenshot size is 1200×900px. This is officially recommended by WordPress Codex guidelines.
How to change the theme screenshot in WordPress?
You can change the theme screenshot in WordPress by creating a new screenshot file in the recommended size (1200×900px) and format (screenshot.png) and then uploading it to the top-level theme directory using an FTP program.
How do I add a screenshot to a WordPress theme?
You can add a screenshot to a WordPress theme by uploading a screenshot.png file that is 1200×900px to the top-level directory of your specific theme.
Can I add a screenshot to a WordPress Child Theme?
If you have created a child theme from your parent WordPress theme, you can still add a custom screenshot.png file in the top directory of your child theme folder.
What is a WordPress theme screenshot?
A theme screenshot is an image that visually represents a WordPress theme. It is typically the first image a user sees when previewing or selecting a theme. Users see the screenshot of all installed themes on their themes settings page at WordPress Admin > Appearance > Themes.
Common WordPress Theme Screenshot Mistakes to Avoid
Even though the recommended size and format for a WordPress theme screenshot are straightforward, many developers still run into issues that prevent the image from displaying correctly.
Here are some common mistakes to watch out for when preparing your theme screenshot.
Using the Wrong Dimensions
WordPress may ignore screenshots that are too small, stretched, or cropped incorrectly. Always stick to the recommended 1200×900px to ensure proper display across the theme installer and preview screens.
Naming the File Incorrectly
The screenshot must be named screenshot.png exactly. Any variation — uppercase letters, extra characters, or different extensions — will stop WordPress from loading the image.
Saving in the Wrong Format
JPG or WebP might seem appealing for smaller file sizes, but WordPress expects a PNG file. Using other formats can result in poor quality or simply not displaying at all.
Placing the File in the Wrong Folder
Your screenshot should be placed in the root directory of your theme folder, not inside assets, images, or subdirectories.
Overly Busy or Unclear Designs
Your screenshot should give users a clear idea of what your theme looks like. Avoid overly text-heavy images or mockups that don’t reflect the actual layout or design.
How to Create a High-Quality WordPress Theme Screenshot
Creating a good theme screenshot goes beyond using the right size and file name. A clean, well-designed screenshot helps users instantly understand what your theme looks like, and it also improves how your theme appears in the WordPress theme browser.
Here’s a simple process you can follow to create a professional-quality theme screenshot.
1. Set Up a Realistic Demo Page
Use your theme to build a proper demo layout before taking a screenshot. Include the main elements users expect to see—header, navigation, hero section, content layout, typography, and colors. Avoid placeholder content that doesn’t reflect your theme’s true design.
2. Capture the Page at the Correct Resolution
Take a screenshot using a browser window sized around 1200×900px. This helps you capture an image with the same aspect ratio WordPress uses, avoiding stretched or compressed visuals.
3. Use Clean, Minimal On-Screen Elements
Close unnecessary browser toolbars, hide the WordPress admin bar if needed, and make sure no scrollbars or unwanted UI elements are visible in the capture.
4. Export as a High-Quality PNG
Save the image as screenshot.png with minimal compression. PNG keeps lines, shapes, and colors sharp—especially important for themes focused on typography or UI-heavy designs.
5. Keep the Design Simple and Clear
Avoid overly complex visuals or excessive text on the screenshot. A simple, clear preview performs better and helps users understand your theme at a glance in the theme selection screen.
WordPress Theme Screenshot Size Summary
The recommended WordPress theme screenshot size should be 1200 x 900 pixels saved in your theme directory as screenshot.png.
To sum it up, here are all the WordPress Theme screenshot details in the handy table below;
| WordPress Theme Screenshot | Details |
|---|---|
| Name | screenshot.png |
| Size | 1200px wide by 900px tall |
| Format | PNG format |
| Upload Location | Top level directory |
To conclude, here’s a quick checklist before uploading your WordPress screenshot.
- Use the correct size: 1200 × 900px
- Save the file as screenshot.png
- Place it in the root of your theme folder
- Capture a clean, realistic demo page
- Hide toolbars, admin bar, and scrollbars
- Keep the design simple and easy to understand
- Export as a high-quality PNG with minimal compression
I hope this detailed guide is helpful to know everything about creating and uploading screenshot for your WordPress theme.
