Learn the basics of Google Tag Manager, how to signup and add Google Tag Manager to your WordPress website manually and by using a Google Tag Manager WordPress plugin.
Also, continue learning how to install the Google Analytics tag to your Tag manager and test to see if everything is working in this complete guide for WordPress.
Adding code snippets to your WordPress blog or website is a real pain!
You have to keep editing your template files to add different code snippets (tags), be that for web analytics, advertising pixels, e-commerce, or other marketing tags.
Wouldn’t it be easier to add a single code snippet once and it handles all such needs for several tags that you need to add or update in future?
It might be slightly less known to those of us who aren’t pro-marketers but there’s a fairly new tool from Google that lets you handle all the codes and tags that you need to include in your website.
Google Tag Manager lets you easily add all code snippets such as analytics, PPC etc. to your website. The best part is that you can add/remove or update your codes from a central platform by just adding the tag once to your website.
Tag managers are becoming increasingly popular and marketers find them really useful. An Econsultancy study reveals that 73% of marketers using a tag management system found that it speeds up their ability to run marketing campaigns, with 42% describing the process as “significantly faster.”
In addition to easy tags management, one added benefit I want to point out before jumping into the complete details is that the use of tag managers can help you significantly improve your page load time.
Tag Managers can be configured to fire only when they are needed on a page, and as they load asynchronously, it can help with your page speed.
In this tutorial, I will walk you through the steps of adding a popular tags management tool – Google Tag Manager to your WordPress website in a few different ways.
First, I will briefly explain what Google Tag Manager is, and why it can be helpful to invest some time in setting it up for your website.
I will then continue with detailed instructions to add it to your WordPress website and make sure it’s up and working perfectly. You can directly skip to the instructions section using this link or other sections of your interest using the Table of Contents.
What is Google Tag Manager?
Marketing is getting more and more sophisticated. Along with several other new marketing technologies, one that has seen massive growth in the last years is the Tag Management space.
“Tags” help marketers to collect insightful data about their website audience and ultimately help webmasters and marketers to better understand and serve their audience.
A large site might need more than twenty tags to implement different marketing technologies. Adding and updating codes for those tags take a lot of time and poor implementation can often slow down your website.
Besides, if you aren’t technical you might need to wait until the technical person gets time to deploy those required marketing tags. This can delay your data collection and there are chances that it can be poorly implemented, not how and when you wanted.
There are simply so many tags that we might need to add to our websites depending on our needs. With Google alone, there are tags for AdWords, DoubleClick, Google Analytics, AdSense, and so on.
Google Tag Manager helps you tackle those problems of adding marketing technology tags by making the process quick and easy with a central platform where you can add/update tags and control everything.
The best part of Google Tag Manager is that it’s completely free and it allows you to add all Google and other third-party tags.
We can add all the codes on our website with a single container code snippet from Google Tag Manager by adding it once in our template file.
How Google Tag Manager Works
Getting deep into Google Tag Manager can make it rather complicated as there’s more to the technical and advanced marketing part. So, I will try and keep it fairly basic and easy to understand for everyone.
To understand how it works – Google Tag Manager uses one code snippet called container that you need to add manually or by use of a plugin to our website.
Once you add the container code, you will need to use Triggers and Variables to control when and where your tags are fired on your website. Triggers and Variables act as rules and conditions that can be defined on the central tag manager platform.
Google Tag Manager comes with built-in tags such as Google Analytics tags but as I mentioned earlier you can add any other third party tags on the platform.
You can continue using the Google Tag Manager as a central platform to further define and update when and where certain tags should fire by attaching different triggers to them.
Here’s an introductory video with basic concepts behind Google Tag Manager and how marketers can benefit from it.
As you can see in the above video, there’s also the Mobile part of it that makes use of Google Tag Manager SDK to integrate into apps. But here we are only concerned about the web part as we need to add it to WordPress blogs and websites.
Why use Google Tag Manager?
The benefits should have been apparent to you already with the problems and solutions discussed above.
To reiterate, the few major benefits of using Google Tag Manager are outlined below.
- Making it quick and easy to add several marketing technology Tags through a central platform (for a non-technical person and with marketers in mind).
- Making the marketing process agile with no time wasted to add any Tags (no longer necessary to wait for your Tech person or department for tags implementation.)
- Quick insights to see if the tags are implemented properly and are working as required.
- Ability to add all Google and other Third-party tags
- Improves your page load time by firing only required tags on a particular page
- Increased performance as your codes execute asynchronously helping your pages to load faster
Setting up Google Tag Manager Account
The first thing you need to do is setup an account on Google Tag Manager. Creating an account is fairly easy and if you have used other Google services such as Google Analytics before, you can even relate to the accounts structure.
Under Account Name, you can use your company name and you can setup the container under your website name (where you will install the tags).
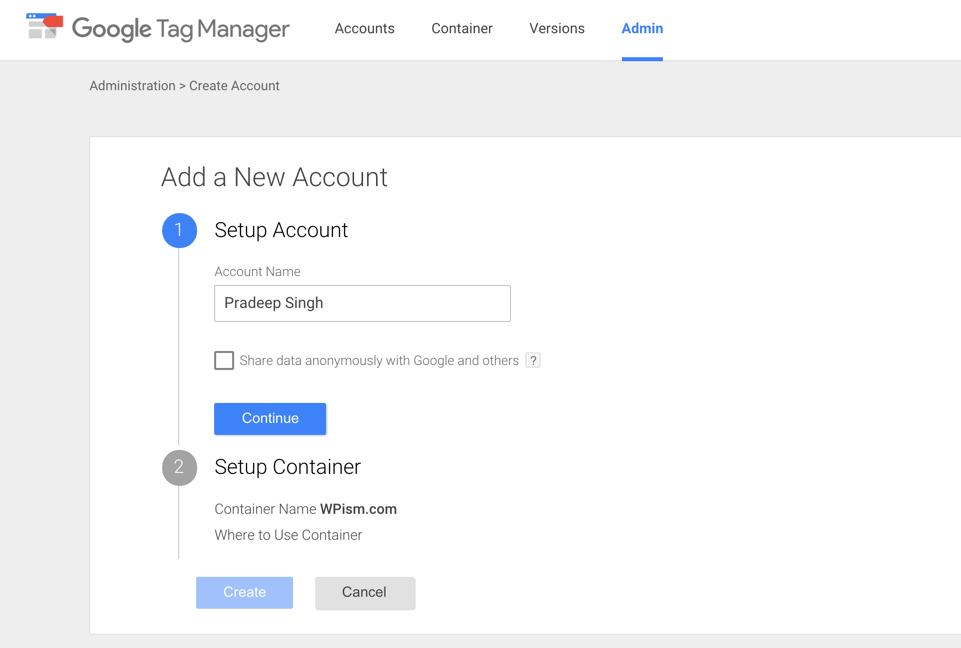
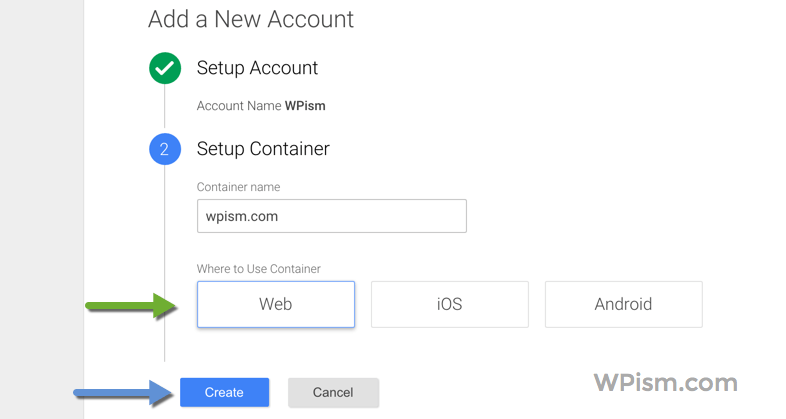
Choose from Web or iOS, Android depending on where you want to install the tags. As we are going to add it to the WordPress website, we will choose the Web.
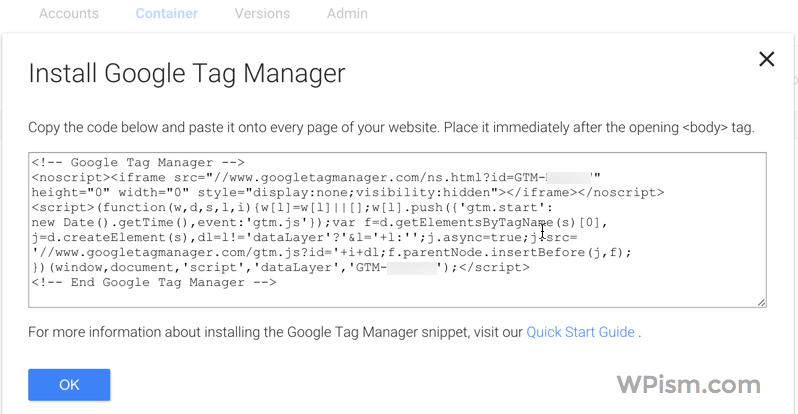
Once you agree to Google Tag Manager Terms and Conditions, you will be presented with a code that you should now add to your website.
Installing Google Tag Manager on your Website
Google has an easy getting started guide that can help you for all simple and complex implementations.
We will need to add the Tag Manager Code immediately after the opening <body> tag in your header. Here’s what the sample code of Google Tag Manager should look like.
Make sure you are replacing two instances of GTM-XXXX with your container ID if you are copying the code above.
If you didn’t manage to copy the code when it was displayed for the first time, you could always get the code for your website by clicking on the GTM-XXXX just beside your container name in the dashboard.
Adding Google Tag Manager Code to WordPress Theme
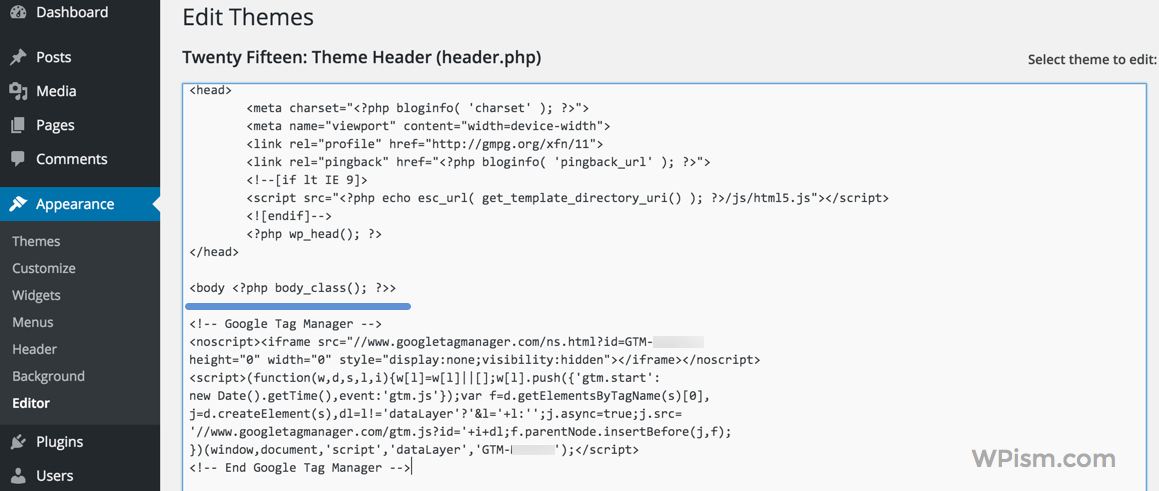
If you are comfortable with codes and editing your theme, you can insert the code in your Theme Header (header.php) file in WordPress. I will not show you how to do this in detail because if you are comfortable editing your code you already know how and where to make edits.
- Use Child Theme of your Template if possible
- Edit Theme Header (header.php) file and add the above code immediately after the opening body tag.
- Don’t forget to add the code again when you change the theme, if you aren’t using a child theme.
See the below screenshot for reference. Please, backup your header.php file and always you a code editor to make any edits locally.
Add Google Tag Manager Code WordPress Plugin
Adding a plugin is the easiest way to add Google Tag Manager to WordPress websites. You can directly install DuracellTomi’s Google Tag Manager for WordPress.

Instructions Installing Google Tag Manager WordPress Plugin
- From your dashboard, Go to Plugins > Add New
- Search for Google Tag Manager and install the
- DuracellTomi’s Google Tag Manager pluginAfter you activate the plugin, it will ask you to fill in your Google Tag Manager ID.
- Copy your Google Tag Manager ID code that is just next to your container name (GTM-XXXXX) in Google Tag Manager Dashboard and paste it in the settings page of the plugin (Settings > Google Tag Manager).
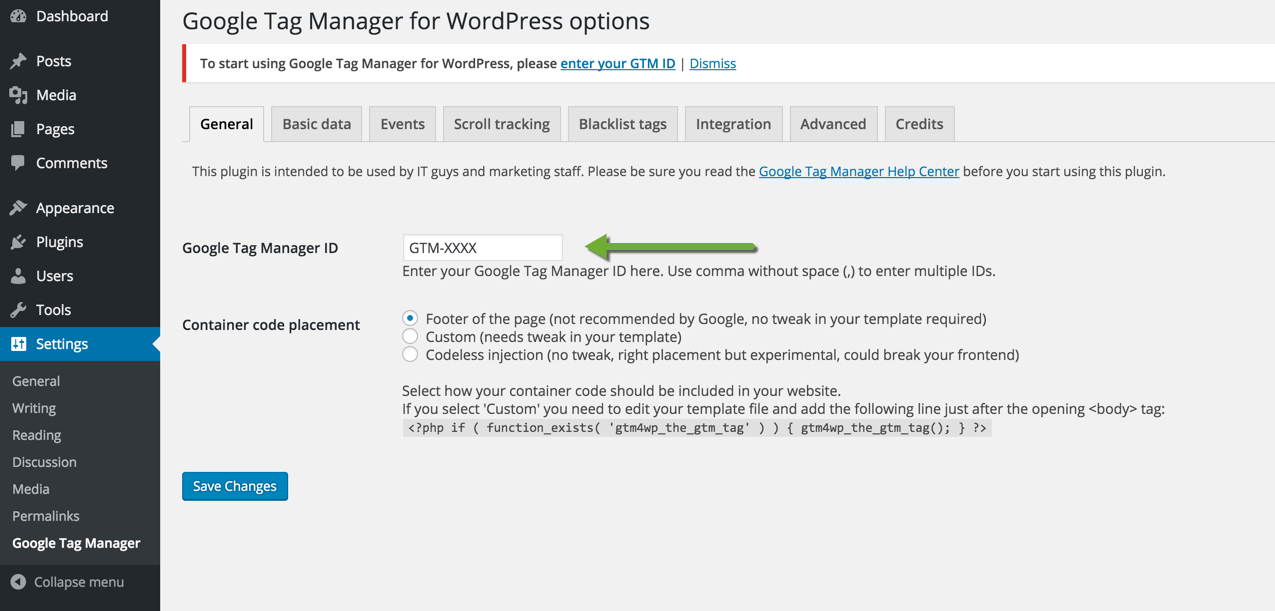
- Save Changes and you should now have Google Tag Manager installed on your website!
But, there’s one problem with this approach.
The plugin places your Google Tag Manager code on the footer of your WordPress website by default. Although this doesn’t require you to make any tweaks to your template, it’s not a recommended practice by Google.
Google recommends placing the code just after the opening body tag (<body>) in your template. Even after installing the plugin, you will need to add the below code in your header.php file for proper implementation.
Again to remind you, only do this if you are comfortable editing your template files.
Choose a Custom option under Container code placement settings and add the below line of code after your opening <body> tag.
So, you might ask why install the plugin in the first place? – It makes it easy to somehow add the code.
And importantly, the plugin is experimenting with right placement that you can try under the Codeless injection settings, but you still have the warning that it’s an experimental feature, and it could break your website.
Additionally, you have additional options to configure for triggers and variables that you can define for WordPress websites from within the plugin. The plugin also adds some powerful options and integrations with popular plugins such as contact form and WooCommerce.
Google Tag Manager for Genesis Websites
If you use the Genesis Framework for your WordPress theme like this website, it can be even simpler to add without using any plugins.
Genesis has several hooks where we can insert the Google Tag Manager code snippet directly.
Editing Genesis Child Theme Template
If you are using Genesis Framework, then you are indeed using a child theme. We will add the Google Tag Manager code to the functions.php file of your child theme.
Again, you will need to be comfortable editing codes/theme files to add it using this method.
Go to the functions.php file of your Genesis child theme (Use an FTP program to open the file preferably in a code editor like Atom).
Use the Google Tag Manager code from previous installation steps to add it to the code below and insert the final code to your functions.php file.
Installing Genesis Hooks Plugin
If you are not comfortable editing the code and writing functions of your own, you can use the Genesis Simple Hooks plugin from StudioPress that provides easy to use interface for modifying your Genesis theme via the hook system.
The plugin provides you with a settings page that you can use to insert your Google Tag Manager code by attaching it to the right action hook.
- Install and activate the Genesis Simple Hooks plugin
- From your Dashboard, go to Genesis > Simple Hooks
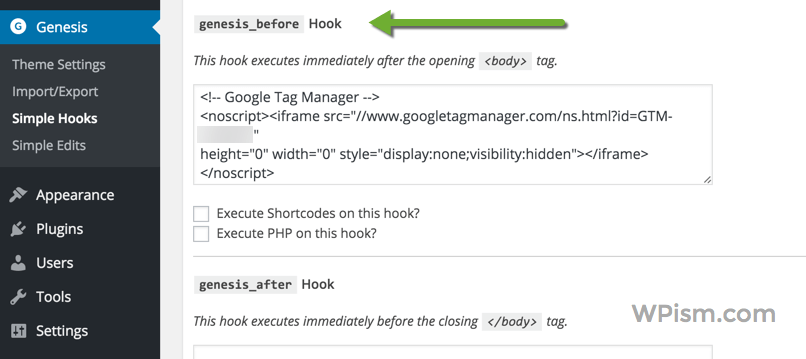
- Find the genesis_before Hook that executes immediately after the opening body <body> tag.
- Paste your Google Tag Manager code in the box (see screenshot below for reference) and save changes.
Preview and Debug Google Tag Manager Installation
Now that you have added the Google Tag Manager code on your website, you can check to see if it has been implemented properly and if the tags are firing on your page.
Publish your Google Tags Container
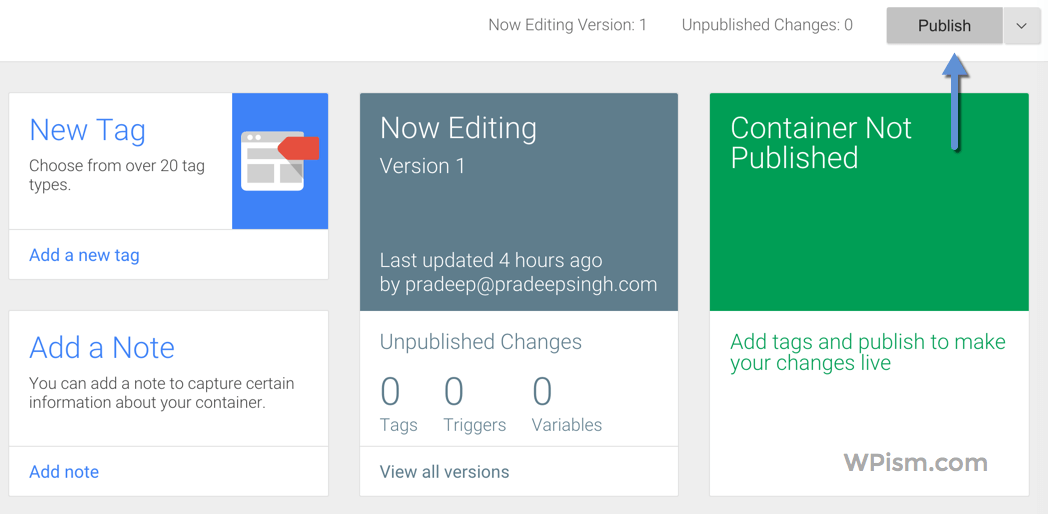
The first thing you need to do is go ahead and publish your container (if you haven’t done so already). We will learn how to add tags to our container once we verify the container tag is working properly.
Preview and Debug your tags
You can now use the Preview mode of Google Tag Manager by simply clicking on Preview Button.
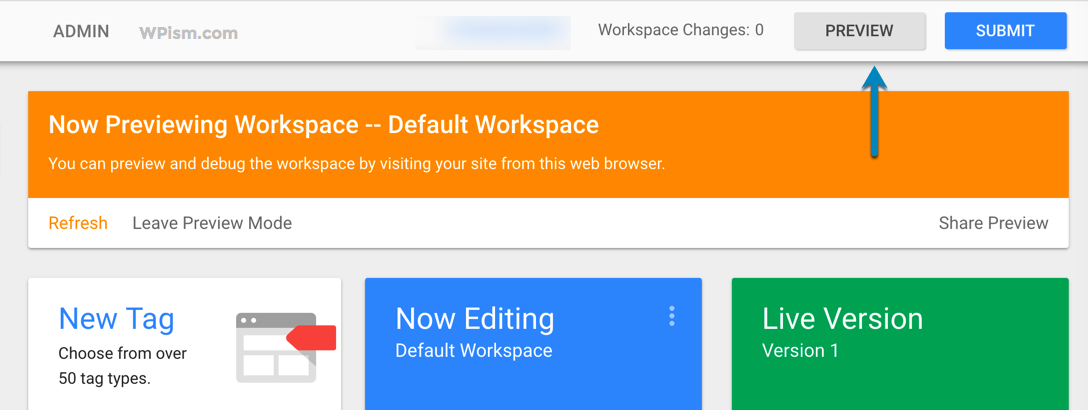
After activating the preview mode, you can debug the version by directly visiting your website. You should see a Google Tag Manager bar below your website when you are in a Preview mode of Google Tag Manager.

This can help you verify and check for problems before you publish your tags.
Test Installation of Google Tags with Tag Assistant
Google has another tool called Google Tag Assistant that helps us verify if the tags are installed correctly on the page.
You will need to install the Tag Assistant (by Google) Chrome extension. Watch the official video below to see how it works in details.
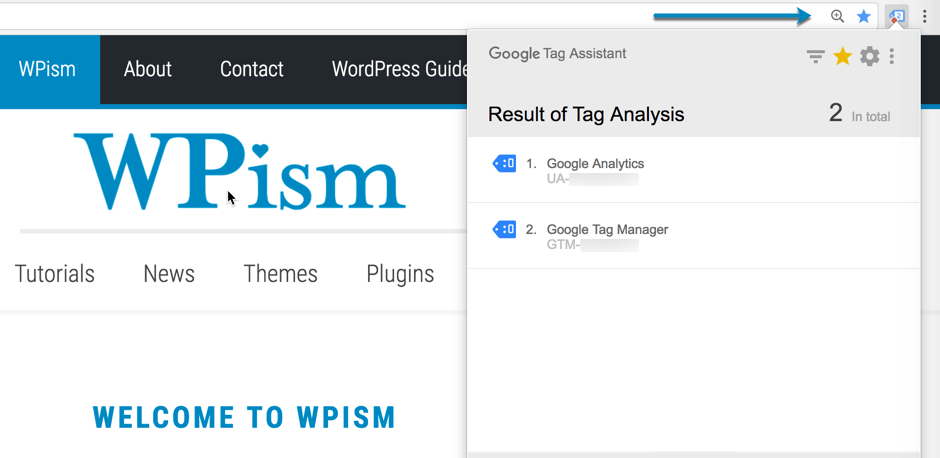
Basically, once you install the chrome extension you will be able to see if the Google Tag Manager code is firing on your page. The Tag Assistant icon on your extensions bar will turn green and show you the number of tags deployed on page.
You should see a green tag assistant icon with 1 tag when you haven’t got anything installed apart from Google Tag Manager code.
If you have installed Google Analytics or other tags, you will see the number of tags in the extension icon with a list of tags fired on the page.
Adding Google Analytics to Google Tag Manager
Okay, so let’s move on to making real use of Google Tag Manager. You can now add hundreds of tags using the Google Tag Manager interface.

To display an example of Google Tag Manager, we will look at adding one of the most popular tag seen on websites – Google Analytics tag.
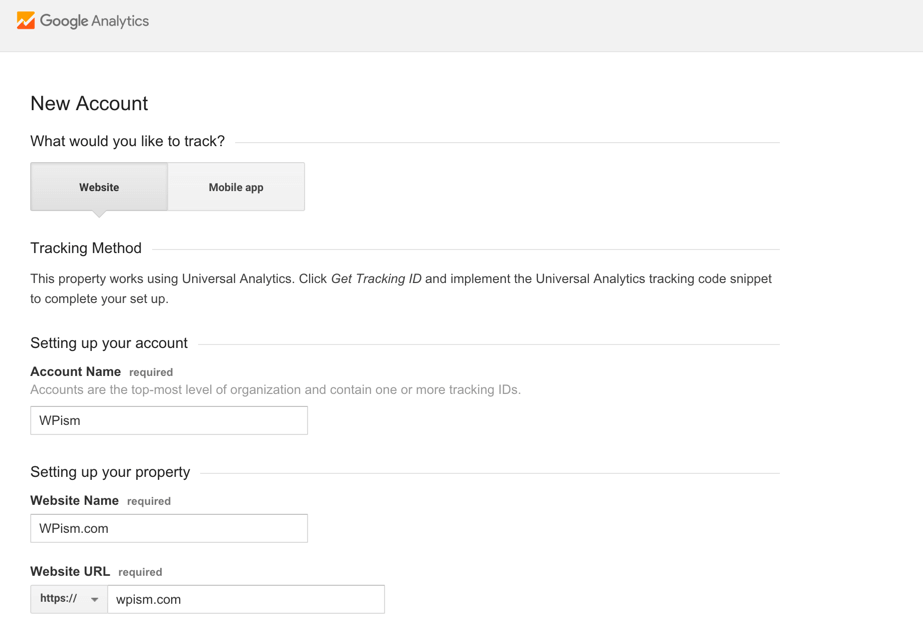
If you haven’t got Google Analytics code for your website, go and add a new account for your website on Google Analytics. Setting up a new account for your website is really easy (see the screenshot below).
Go to Google Analytics, sign in with your Google Account, and set up your account by filling your Account Name and add your Website name and URL to add your property.
Getting Tracking ID for Google Analytics
Fill in the details and click on “Get Tracking ID” at the end of the page. Once you agree to terms and conditions, you will be taken on to a page with tracking ID of your property.
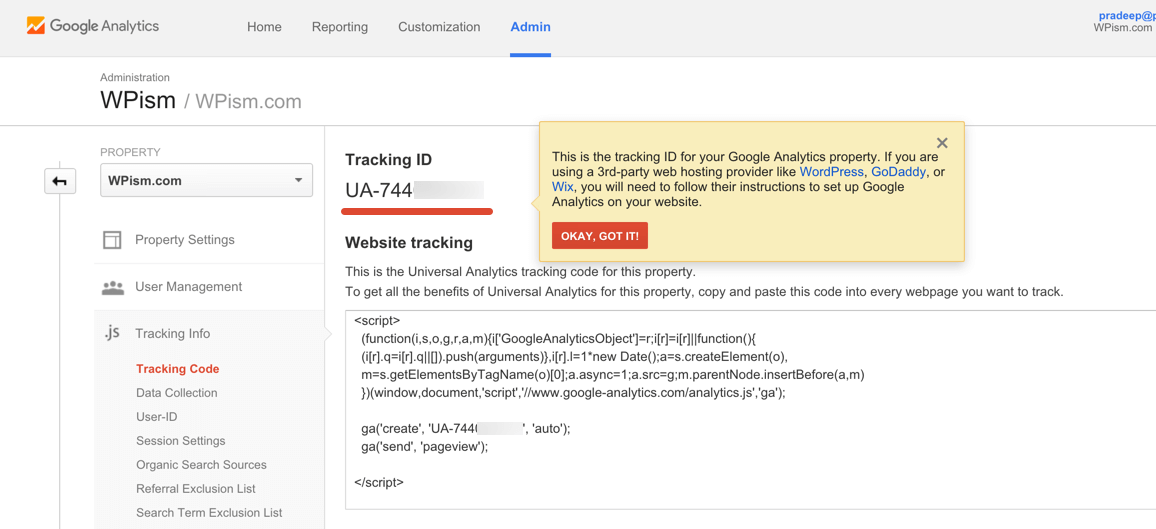
Copy the Tracking ID (see underlined ID above)
If you have already setup a Google Analytics account, you can find your tracking ID by navigating to Admin → Property → Property Settings or in Admin → Tracking Info → Tracking Code.
Getting back to the Google Tag Manager platform, let’s add the Google Analytics tag to our Tag Manager container.
Steps to add Google Analytics to Tag Manager
Click on “Add New Tag” from your Google Tags Manager container dashboard.
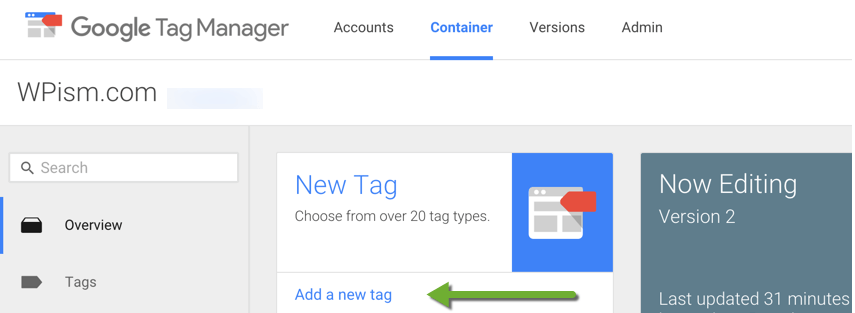
You will now see several products that Tag Manager has made it easy to add tags.
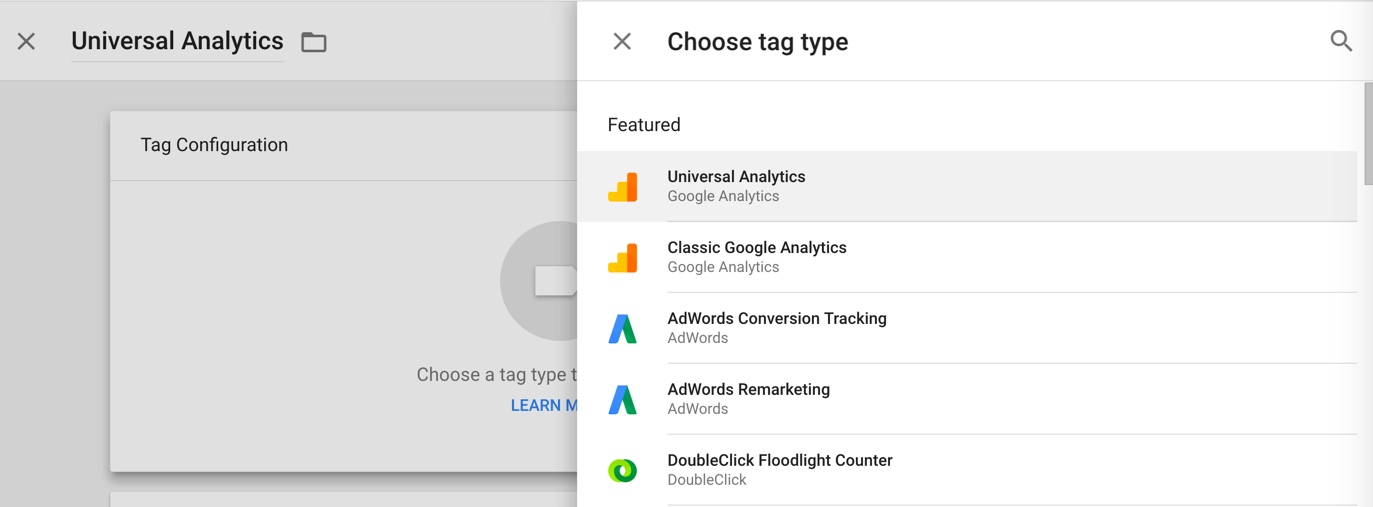
Step 1: Under Tag Configuration, Click on Choose a Tag Type icon to begin the setup process.

Step 2: Select the latest Universal Analytics under Tag Type from the sidebar.
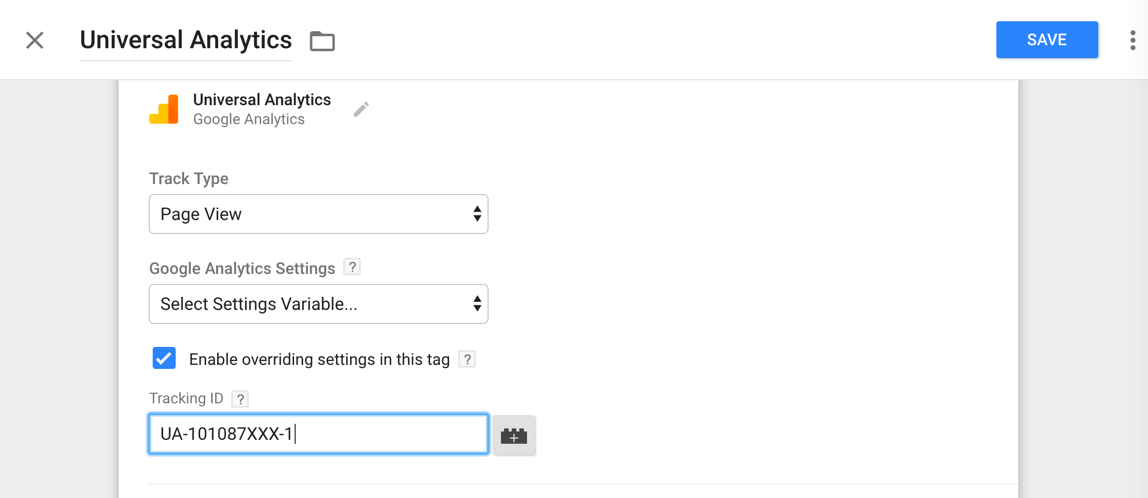
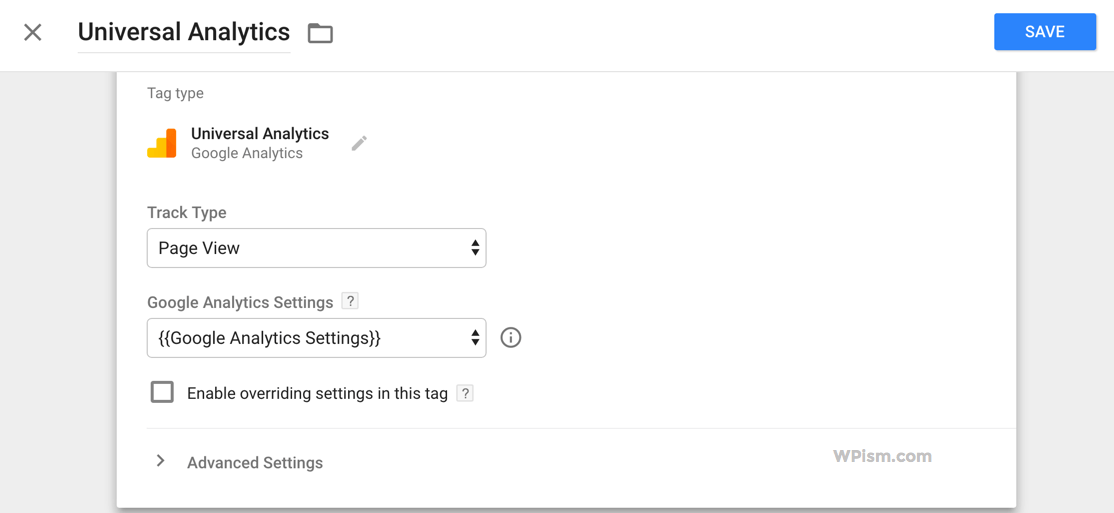
Step 3: Under Track Type, select “Page View” and under Google Analytics Section, you will see an option to select a new variable or an option to enter your Tracking ID.
Option A: This is the easiest option if this looks too technical for you. Click on “Enable overriding settings in this tag” and you can simply enter your Google Analytics Tacking ID.
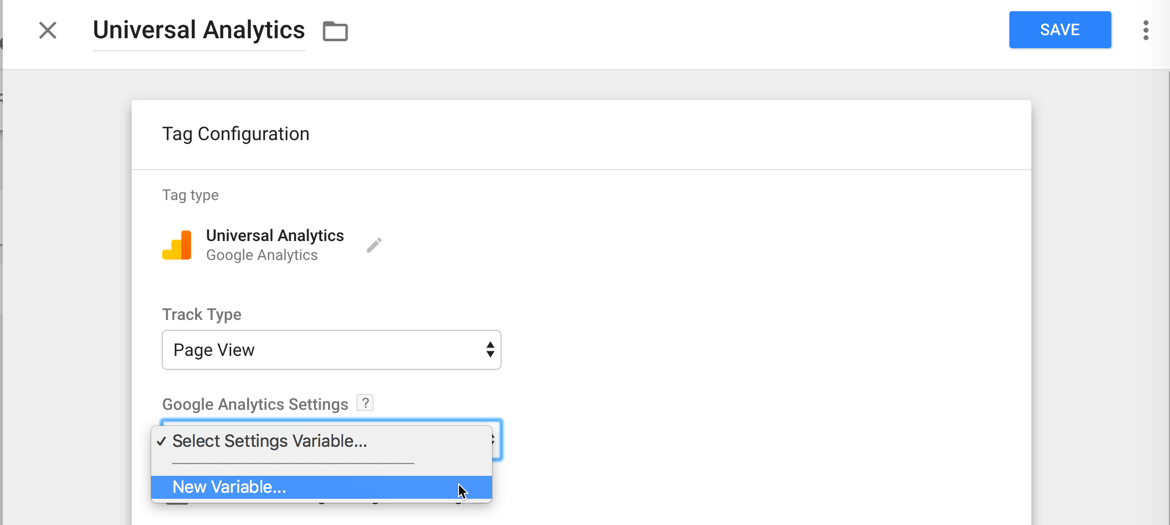
Option B: You can choose to define a new variable under the “Select Settings Variable” using your Google Analytics Tracking ID. The benefit of using Google Analytics Settings variable is that you can use this variable and maintain settings across other tags in the future.
Select “New Variable” under Google Analytics Settings.
You will be presented with Variable Configuration details with Google Analytics Settings already defined as Variable Type. Enter your Tracking ID and you can leave Cookie Domain to Auto.
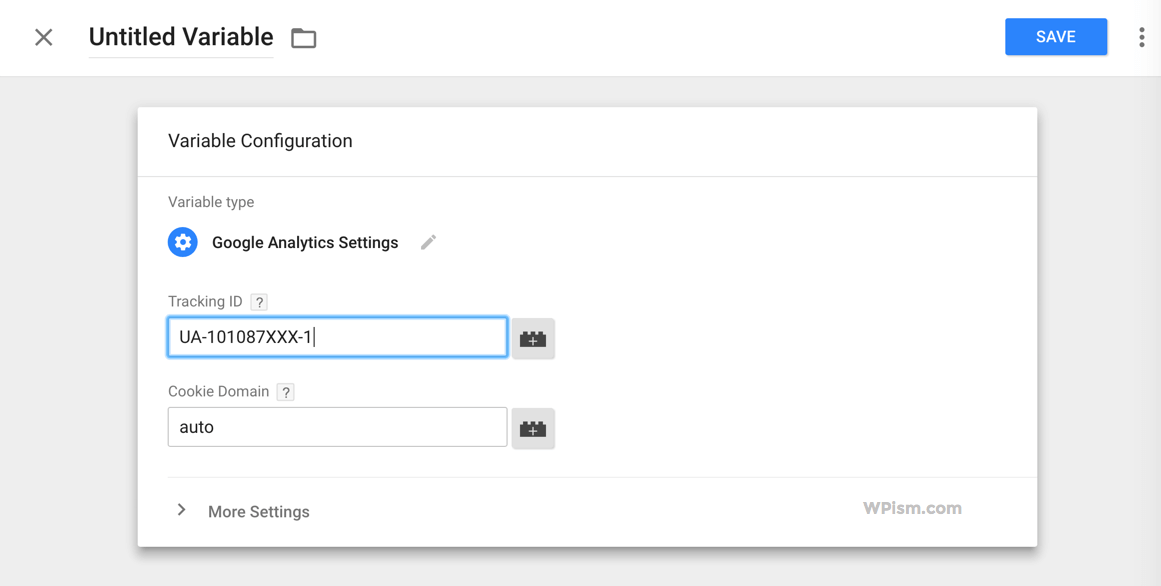
Click Save on Top to save the settings and you will see a dialogue box to rename your Variable.
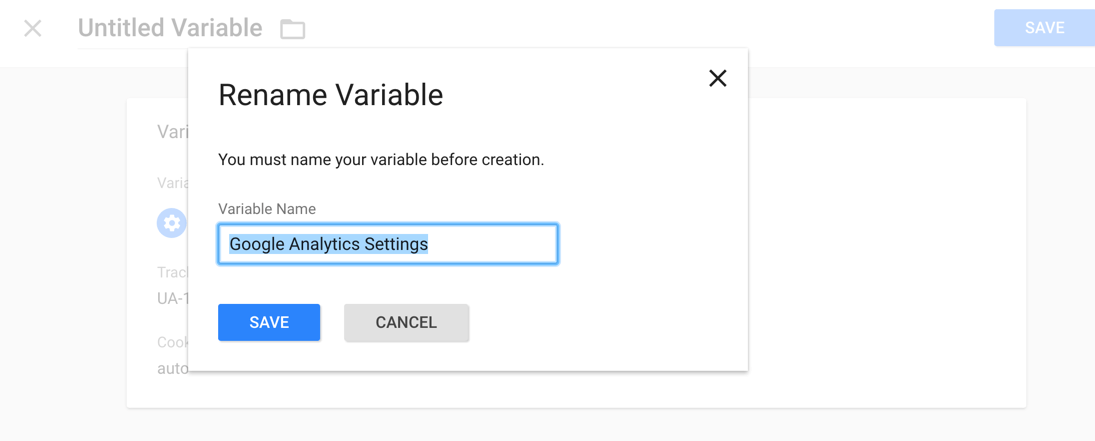
Click Save to proceed with Google Analytics settings selected under the variable.
Step 4: You will now be prompted to Add a Trigger to define when the Google Analytics tag should fire on your website.
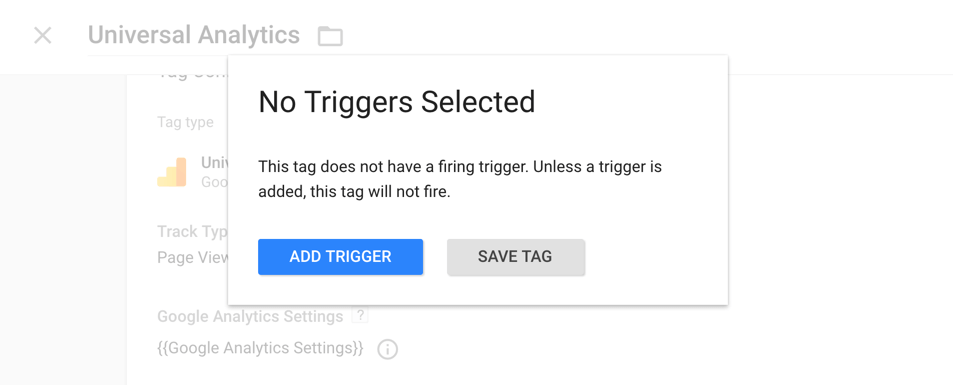
Click on Add Trigger and Select All Pages from the sidebar.

Choose All Pages for the tag to be fired and finally click on Create Tag.
Step 5: Click Save on Top to save the Universal Analytics Tag that you just created.

You will need to name your tag and finally save it.
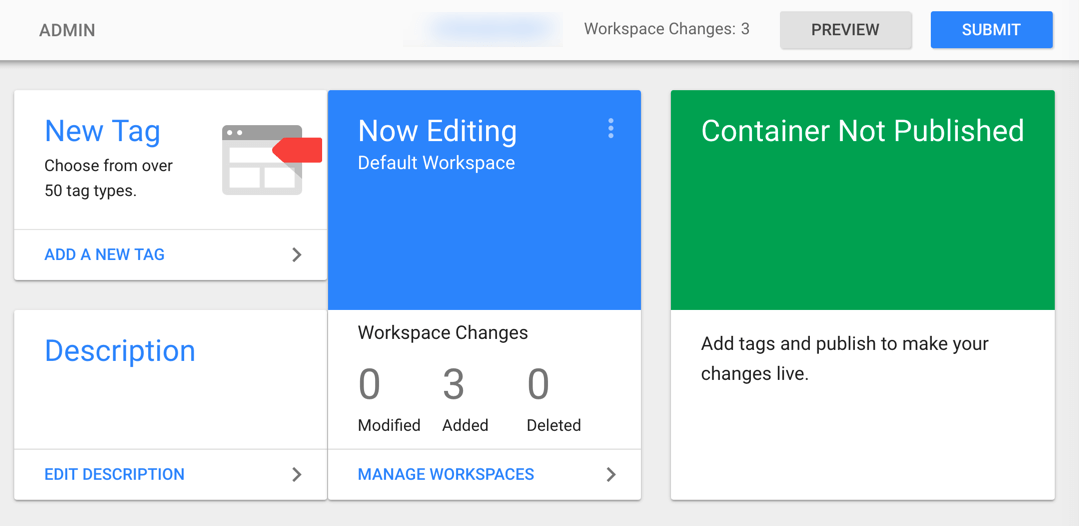
Step 6: Submit the changes. You will see some WorkSpace changes added under Now editing section. Click submit on the top to proceed to save the changes.
Step 7: Publish the Tag in your container. If this is your first time, you can select the version name and click on Publish to publish the version.

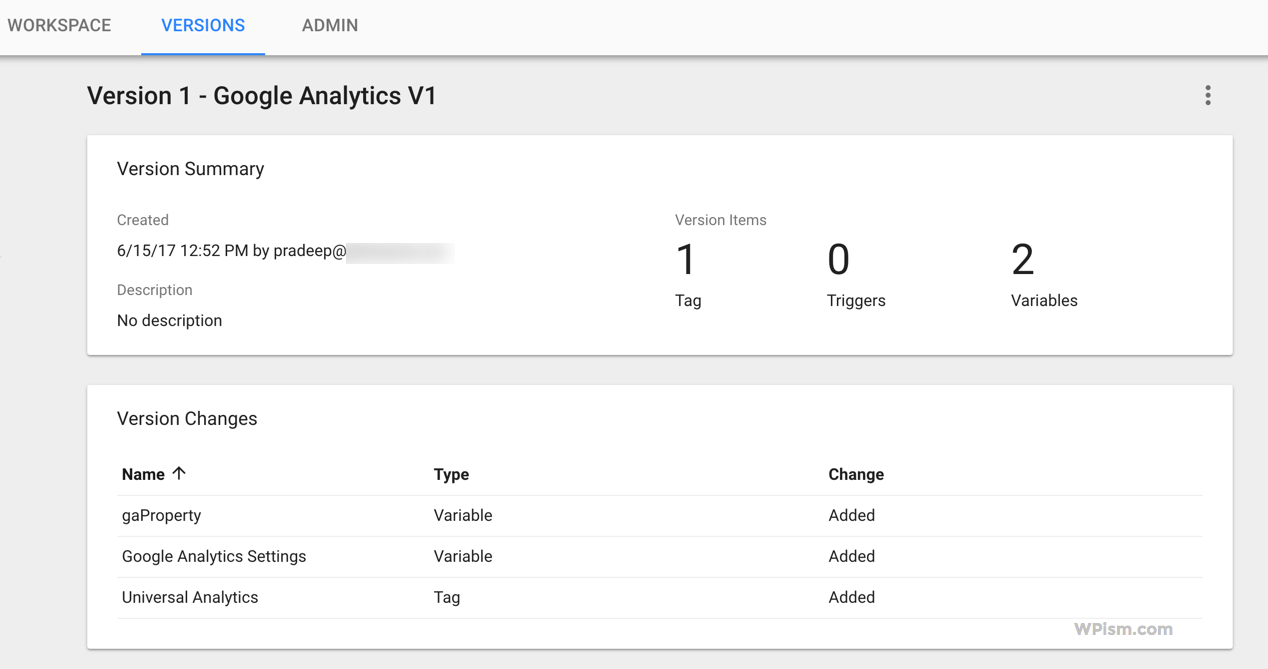
You can now see that the version has been published with all changes including the Google Analytics settings.
Now that you have setup a new tag, you can go ahead and preview the tag on your website.
You should finally see a success message with your live changes.
That’s all you need to do to add the Google Analytics code to your Google Tag Manager.
Note for slightly advanced users: In Step 3, instead of directly pasting the Tracking ID, you can just select a Variable by defining one with a value of your Analytics Tracking ID. Either go for option B in the Step 3 above or follow the steps below to define variable.
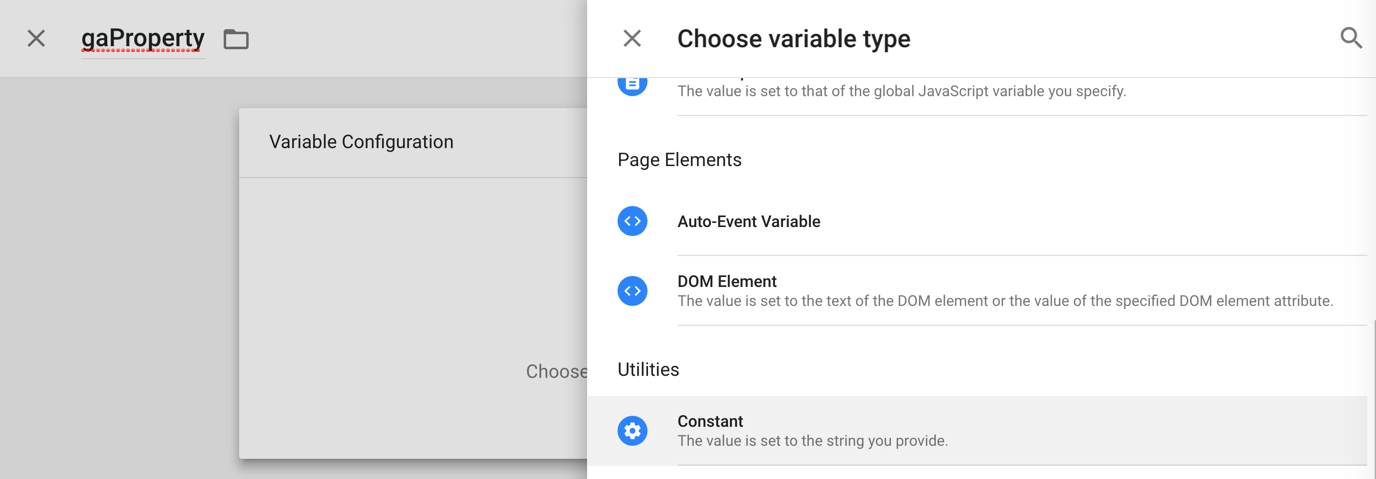
To create a new variable called gaProperty (go to Variables > Add New) and add your Tracking ID as value to that variable (see screenshot below).
You will first need to choose the variable type. Click and choose Constant under Utilities Section from the sidebar.
Now, under the value section, simply enter the Google Analytics Tracking ID that you got when you signed up for Google Analytics.
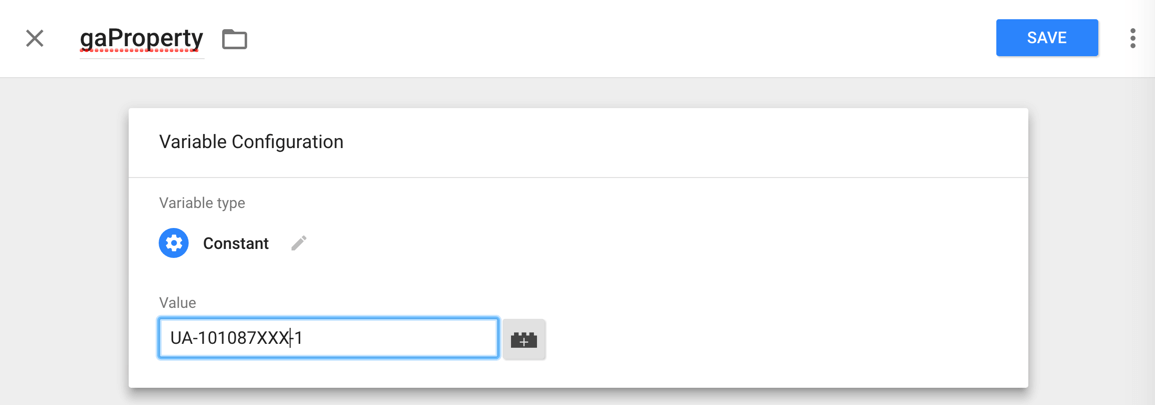
The advantage of using variables as such is that if you are looking to create multiple tags, you can simply select the gaProperty variable (or any other variable you create) instead of having to manually include it each time. It can also save you time in case you have to change your Google Analytics property and use a different ID.
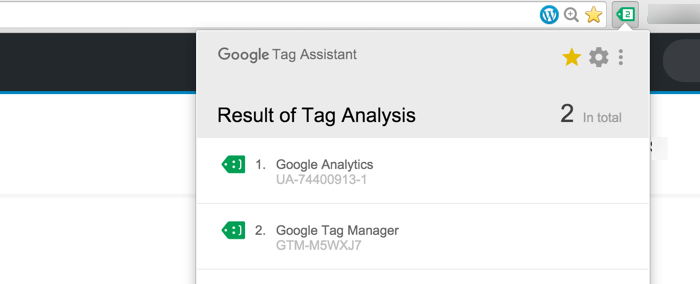
You can now use the Google Tag Assistant extension again to test if the Google Analytics tag is firing on the page. As you can see in the screenshot below, the tag assistant icon shows 2 tags on the page.
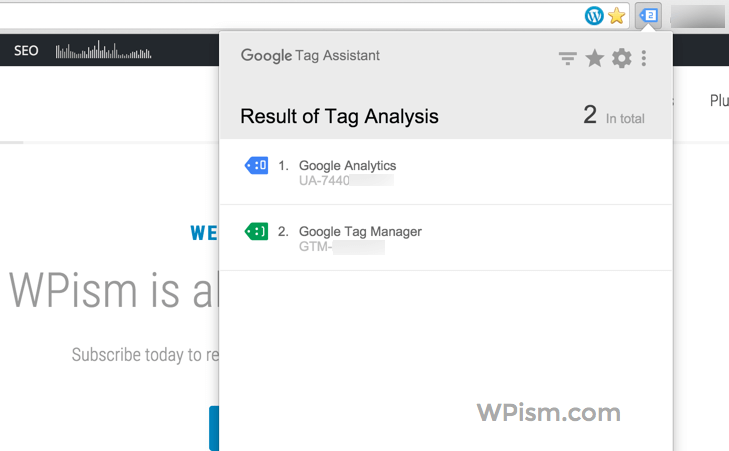
Note: The Chrome extension sometimes can be buggy and tell you that you haven’t placed the tags right way. Make the right placement and don’t worry much about the issue as I can see several other users reporting some problem with the extension.
As you can see, the above screenshot initially shows I haven’t placed the Google Analytics tag the recommended way. After refreshing it few times, it all turned green!
You can now continue adding other tags that you need for your website such as Google Adwords, Facebook pixels, etc. to your Google Tag container.
Beyond the Basics of Adding Tag Manager
This tutorial simply introduces you to the Tag Manager tool and enables you to add few universal codes such as Google Analytics to your website.
Google Tag Manager and its application on web and mobile, however, is a sophisticated topic and there’s so much to learn about advanced marketing topics.
If you are interested in exploring more, I would like to recommend few courses and resources that can help you further your learning.
- Google Tag Manager Fundamentals – Best basic course to get started with Google Tag Manager, officially available for Free from Google.
- Understanding Google Tag Manager (GTM) on Lynda.com that cover the topic in details.
- Search for recorded webinars and other free videos available on Google Analytics’ YouTube channel.
Use Google Tag Manager?
Google Tag Manager is a really useful tool for marketers and webmasters. If you are using several codes on your website, you should make an effort to learn and install the codes. Best of all, it’s free to use and I am sure it will be worth using it.
Did you manage to add Google Tag Manager and Google Analytics tag to your WordPress website? Let me know if you found the tutorial helpful.
Updates
June 17 – Updated entire tutorial with screenshots from the latest release of Google Tag Manager.


This seems like great tool Pradeep, thanks for sharing! If I am not mistaken, those who wants to promote their business online using Google Adwords or any other Google service, they will have advantage using this. Or is it for otherwise traffic generation purposes as well?
Hi Pankaj,
That’s right – It will be beneficial for those who use tags of services such as Google Analytics, Google Adwords or any other services such as Facebook advertising pixels etc.
You too can use it if you are using Google Analytics for your blog.
However, it isn’t related to traffic generating purposes.
Thank you Pradeep, I appreciate the article. I’ve been looking for the correct way to integrate Google Tag Manager into a Genesis WordPress site. This worked perfectly by adding the function you showed.
Hi Thomas,
Thank you for your comment. Glad that I was able to help.
Thanks for the thorough overview! This was just what I needed to kick things off on two projects that I’m working on LocalBasket.com and HubCrowd.com.
I’ll be sharing your guide in a private forum for eCommerce entrepreneurs that I belong to eCommerceFuel.com.
You have included this sentence twice.
The best part of Google Tag Manager is that it’s completely free and it allows you to add all Google and other third-party tags.
Any chance of woo-commerce tut implementation, thats tricky part i found?
cheers, Lee
I’ve had 20+ years of corporate big-systems information systems experience, but have only recently be acquiring web-skills. Not only do have Studiopress Genesis installed on WP, but also have Cobalt-Apps Dynamik Website Builder.
I have been spending a lot of time and struggling mightily to figure out how to get GA events posted for my website (sessions and pages were easy with gtag.js). I have writing bunches of js tag code that I can’t get to work. And I have been failing to get the GTM code (2-parts) installed in the right places.
Your information about Genesis Hooks reminded me of something: Dynamik has an elegant hook system under its Dynamik Custom menu. Now that I have remembered that, things are taking off.
Furthermore, of the many, many articles that I have been reading about the GA event tag subject, yours, by far, is the best and clearest that I have discovered. It boosted my initial Tag Manager account into high-gear.
Thank you. Best regards.