

It’s strongly recommended to set up 301 redirects in WordPress when you change the URL (permalinks) of your posts and pages or move your website from one domain to another.
If you are changing the URL / domain of your WordPress website, you need to plan carefully so that you don’t lose any of your existing traffic and SEO elements for existing posts/pages for your old domain.
Adding a 301 redirect to your posts and pages is really easy in WordPress, and there are plenty of plugins to help you implement them in a few simple steps.
I will introduce you to a few ways you can easily add a 301 redirect to your posts and pages or the entire domain of your WordPress blog/website. Besides, I will help you implement these redirections while retaining your existing traffic and SEO.
Let’s start by learning what a 301 redirect is and when and why you should add 301 redirects.
Feel free to skip directly to the Section of different ways if you already know about 301 redirects.
What is a 301 Redirect?
A 301 Redirect is one of the redirection ways that indicates the page has permanently moved to a new location.
With regards to SEO, there are three main kinds of redirection that we can use to redirect one URL to another.
- 301, “Moved Permanently”
- 302, “Moved Temporarily”
- Meta Refresh
A 301 redirect indicates that the URL has “Moved Permanently” and passes more than 90% of search engine link juice to the new URL.
If you are not moving to the new URL permanently, you might consider using 302 redirects or other redirects, depending on your situation.
We will dig further into permanent 301 redirects in this tutorial, but you can research other types of redirection on your own.
When should you add 301 Redirects?
You need to understand when you should be using 301 redirects. Let’s look into a few cases where 301 redirects might be helpful.
- You change the directory of your WordPress installation.
- You have moved your website to a New domain, and you want the old URLs from a previous website to point to the new URL.
- You change the Permalinks (URL structure) of your posts and want to redirect people visiting old pages to the right pages.
- You want to maintain a preferred (canonical) destination for your homepage. (Redirecting the www version to the non-www version of your homepage).
In all the above cases, we want the 301 response status code as we have changed the URL forever.
Why add 301 Redirects?
So now that you know when to add 301 redirects, I want to point out a few important reasons why you need to choose explicitly 301 redirections.
Your Visitor’s User Experience
You don’t want your website visitors to land on a page with a 404 error because you have changed your URL. Other websites might have linked you with your old permalink, and you want to help your readers by directing them to the right page if you have changed your URL.
Search Engines – SEO Reasons
Your old URL is already indexed by several search engines, and you want to retain the link juice (ranking influence) of those search engine-indexed pages when you change the URL.
Adding 301 redirects is the best practice that search engines take into consideration to understand that the page has moved to a new URL. Search engines thus record the change and pass the ranking and trust to a new URL.
Of course, this will take some time for search engines to crawl and make the changes. Further, search engines will also take in several considerations of the new domain if you are entirely changing the domain name itself.
301 redirect WordPress
Adding a 301 redirect in WordPress is really easy. Depending on whether you are changing permalinks or the entire domain URL, here are a few methods that you can use in WordPress.
Top WordPress Plugins for 301 Redirect
Plugins make a lot of things easier in WordPress, and unsurprisingly there are a few popular WordPress plugins that make adding 301 redirects really easy.
1. Redirection WordPress plugin
Redirection is one of the most popular plugins for managing 301 redirections available in the official WordPress repository.

- Download and Install the Redirection plugin from the WordPress repository or by searching it within your dashboard.
- After activating the plugin, go to Tools > Redirection
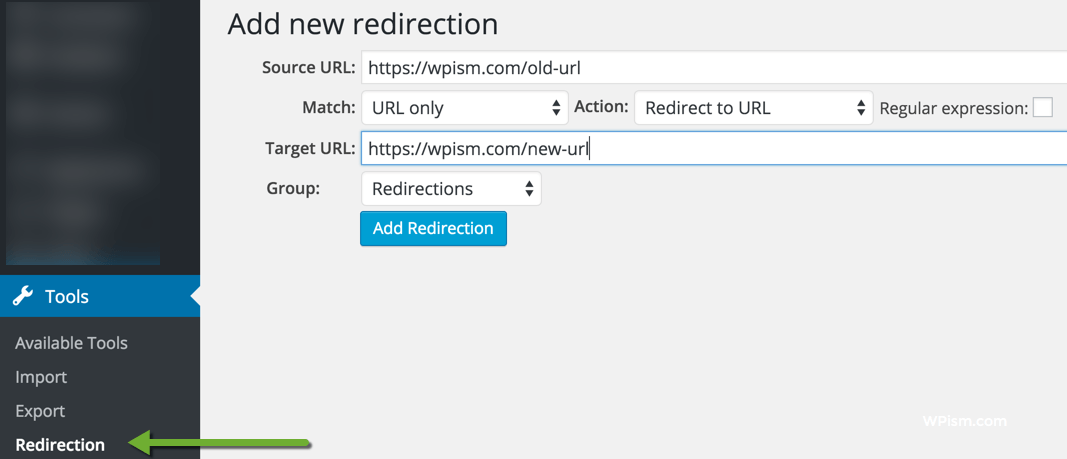
- Define the Source URL (your old, existing URL) and the Target URL (your new URL that you want to redirect to) and click on Add Redirection.
- A 301 redirection type is added by default! And that’s all that you need to do
The redirection plugin is a powerful plugin and has several other options.
One of the most useful features (also why I recommend using this plugin) is that it automatically adds a 301 redirection when you change your post URL in WordPress at any time.
Other features, such as 404 error monitoring and custom redirection methods (301, 302, and 307 redirects), can be useful for wider SEO purposes.
The plugin is also available in more than 25 languages.
2. RankMath SEO plugin
If you have an SEO plugin installed on your website already, chances are that the plugin might come with a built-in redirection feature.
We use the RankMath plugin here at WPism, and the plugin has a built-in feature for redirects reducing the need for any additional plugins.
While RankMath is a full SEO plugin with a lot of features, it can be a useful option to manage the overall SEO of your website with the redirection feature included in your plugin.

You can download the free version from the WordPress repository. We use their pro version, and if you want a complete WordPress SEO plugin, we highly recommend checking out their premium version features.
Follow these instructions to set up WordPress 301 redirects using the RankMath plugin.
- Download and install RankMath Plugin.
- Once installed, go to RankMath > Redirections
- Click on Add New on top of the page you will see a box to add your redirections.
- Enter your old URL in the Source URLs and the new URL in the Destination URL box.
- Select 301 Permanent Move in the Redirection Type and click on Add Redirection.
See the screenshot below for a complete steps overview in the RankMath plugin interface.
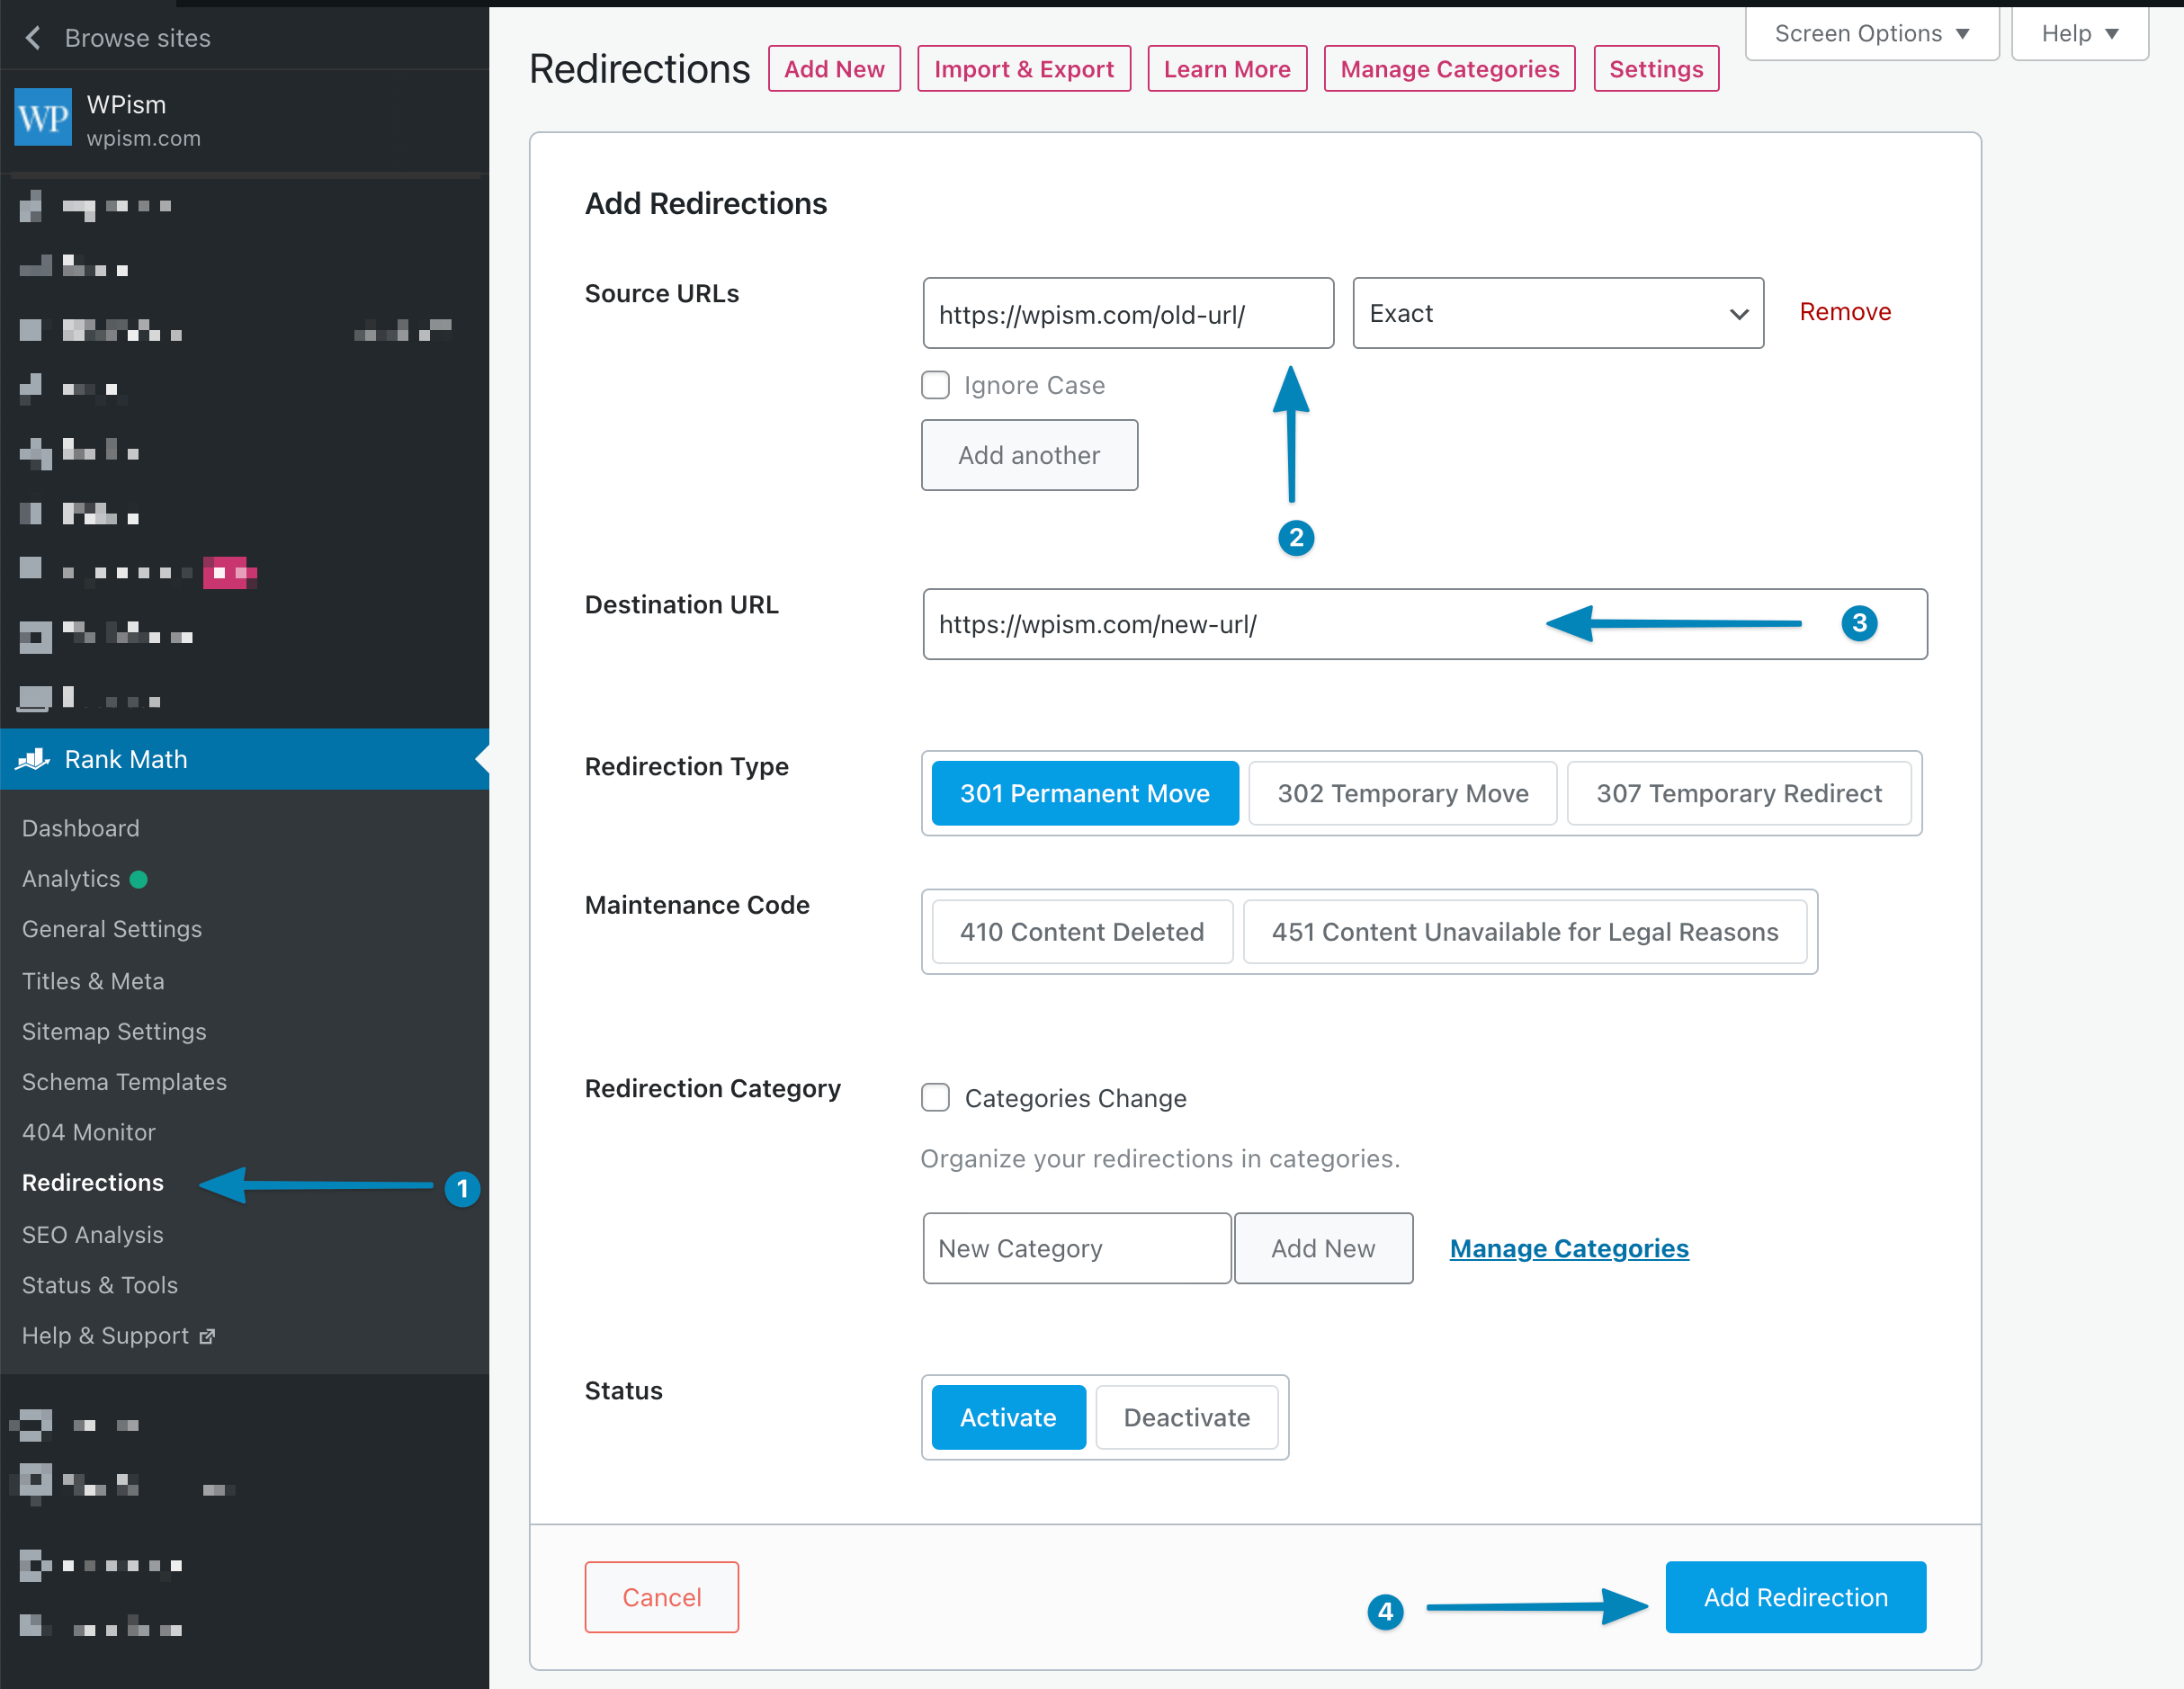
As you can see in the screenshot, you have options to manage other WordPress redirection types, including 301 Temporary Move and 307 Temporary Redirect using the RankMath plugin.
I highly recommend checking out their Pro version and using a single SEO plugin to manage all WordPress SEO needs, including Redirections.
3. Simple 301 Redirects Plugin
This is another WordPress plugin that lets you simply add 301 redirects. Simple 301 Redirects is also one of the most used plugins on WordPress.
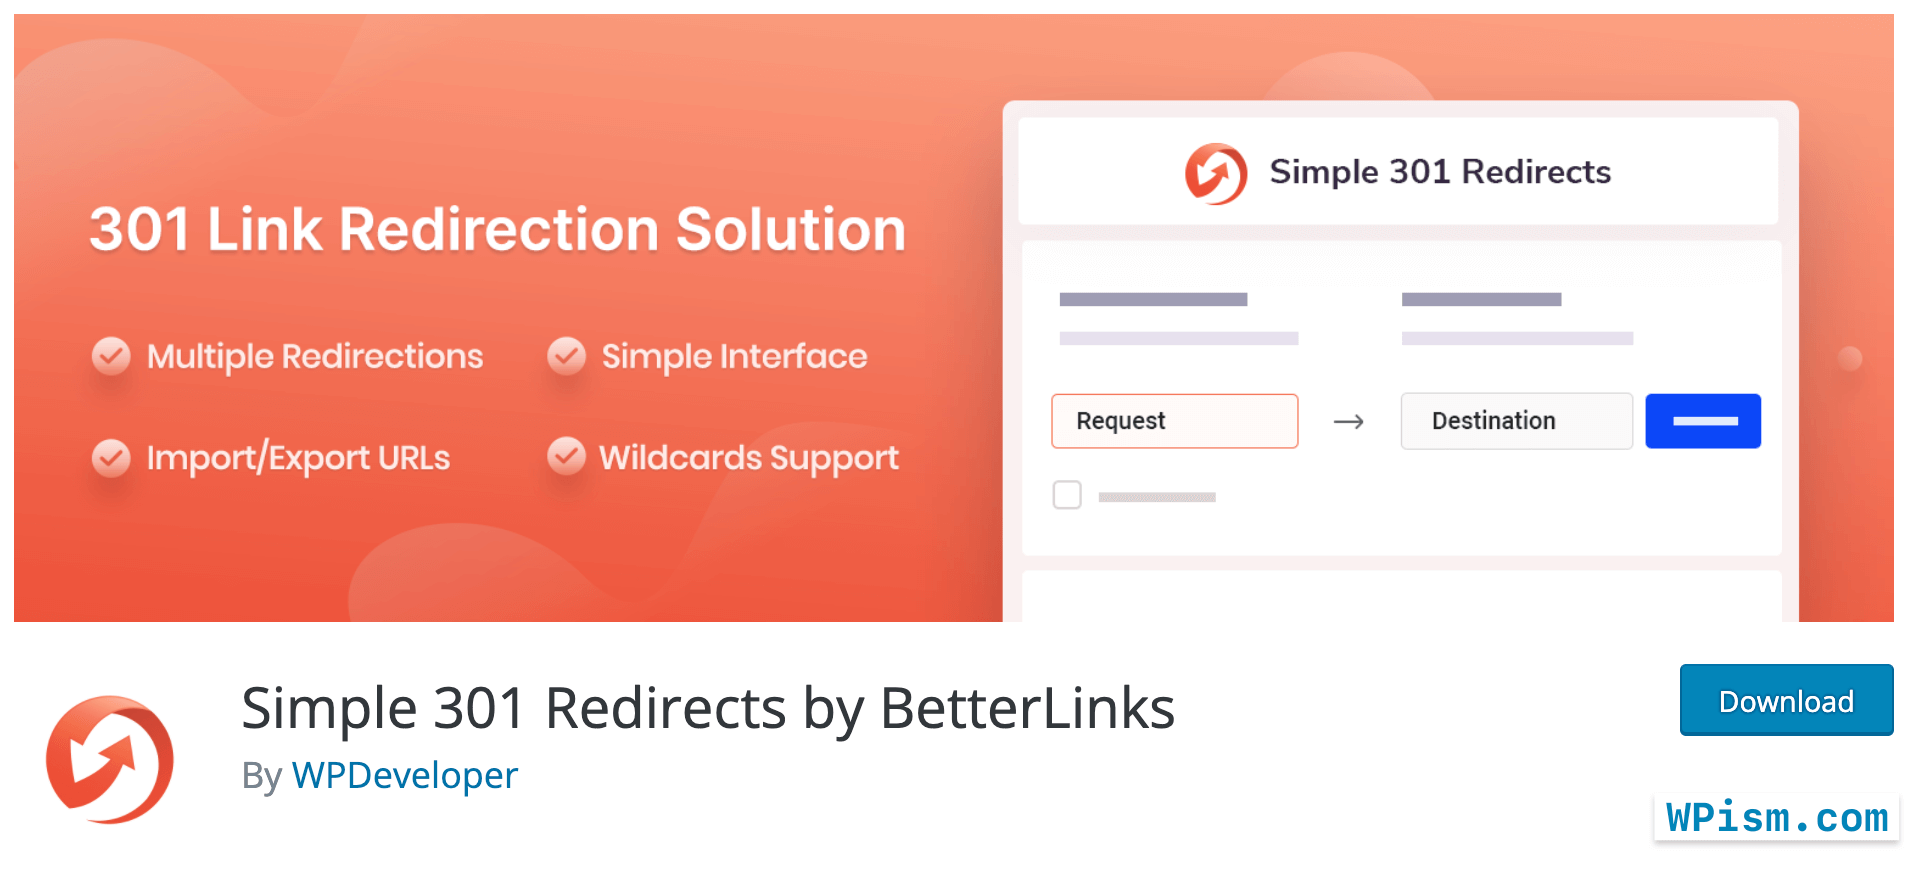
- Download and install the plugin from WordPress repository.
- Once activated, go to Settings > 301 Redirects page.
- You will see two clear boxes to add your OLD URL in the Request box and the new URL in the Destination box.
- Click Save Changes, and it automatically adds a 301 redirection type.
You can also use Wildcards with this redirects plugin. To use Wildcards, check the “Use Wildcards” checkbox just below the URLS boxes.
You should also put an asterisk (*) after the folder name that you want to redirect. See the image and example below.
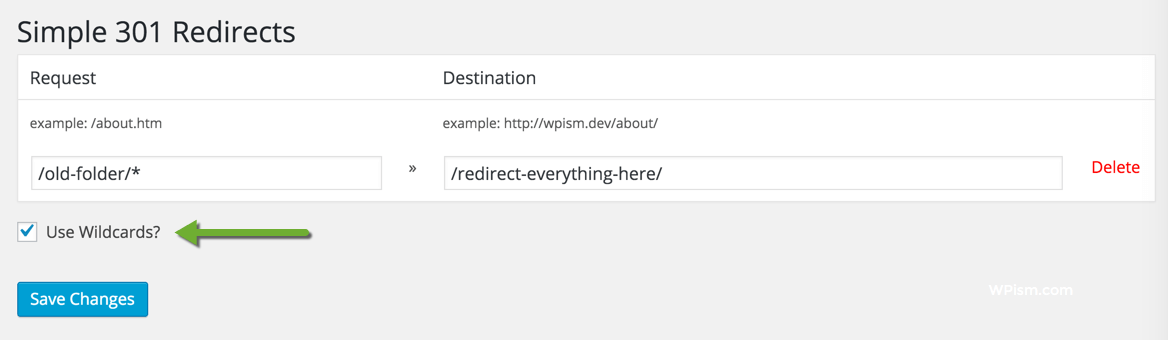
Example
Request: /old-folder/*
Destination: /redirect-everything-here/
4. Quick Page/Post Redirect Plugin
Quick Page/Post Redirect Plugin helps you to quickly add different types of redirects (301, 302, 307, meta) to your WordPress pages and posts.
- Download, install and activate the Quick Page/Post Redirect Plugin from the WordPress repository.
- You can add redirects using two ways – “Quick Redirects” and “Individual Redirects”.
- To add Quick Redirects, go to the Quick Redirects menu that you will see after activating the plugin.
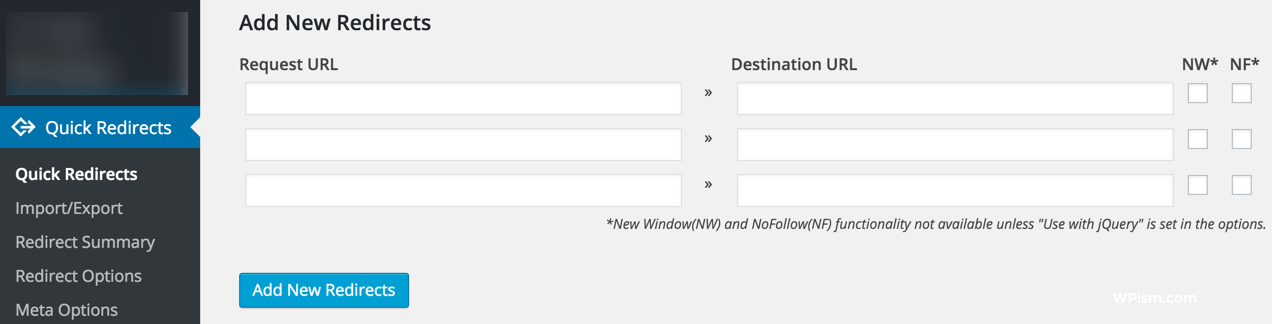
- Enter the Request URL and the Destination URL, and the plugin will automatically add 301 redirects by default.
- You can delete existing redirects by clicking on the trash icon at the end of the row and edit a redirect by clicking on the pencil edit icon.
- Individual redirects are useful for redirecting menu items, duplicate posts, or redirecting any existing pages to a different URL.
- You will see a meta box below your visual editor where you can add a Redirect / Destination URL. Choose the 301 redirects from the option (see the image below).
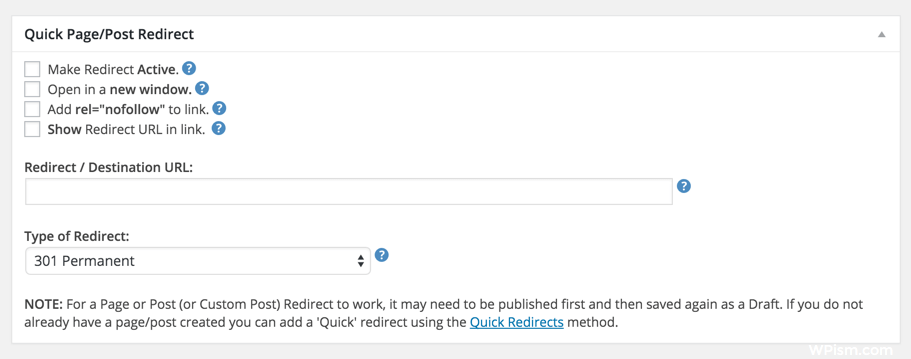
One final useful option I want to point out in this plugin is the ability to add ‘rel=”nofollow“‘ to the link if you don’t wish to pass the search engine rank juice to the redirect URL.
5. Safe Redirect Manager – WordPress Multisites
If you are a developer or use WordPress Multisite, I recommend using the Safe Redirect Manager plugin.

This plugin comes from trustworthy developers at premium WordPress agency- 10up and helps you to manage your website’s HTTP redirects safely.
- Download and Install the Safe Redirect Manager plugin from the WordPress repository or zip via Github.
- Once activated, go to Tools > Safe Redirect Manager.
- Click on Create Redirect Rule at the top of the page.
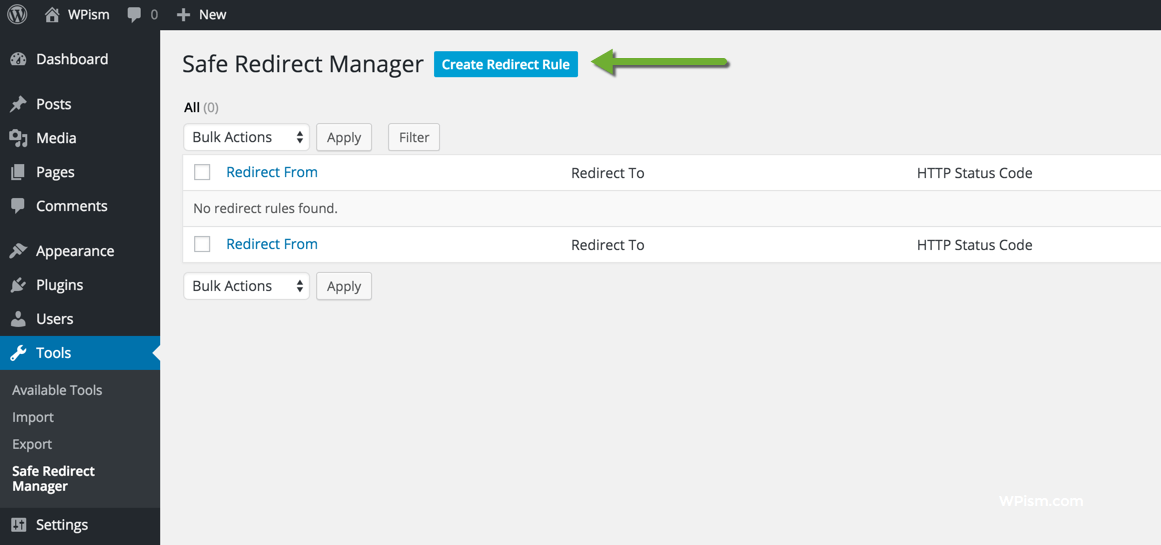
- Under redirect settings, fill in the Redirect From: and Redirect To: URLs.
- Under the HTTP Status Code, you will need to select the “301 Moved Permanently” manually.
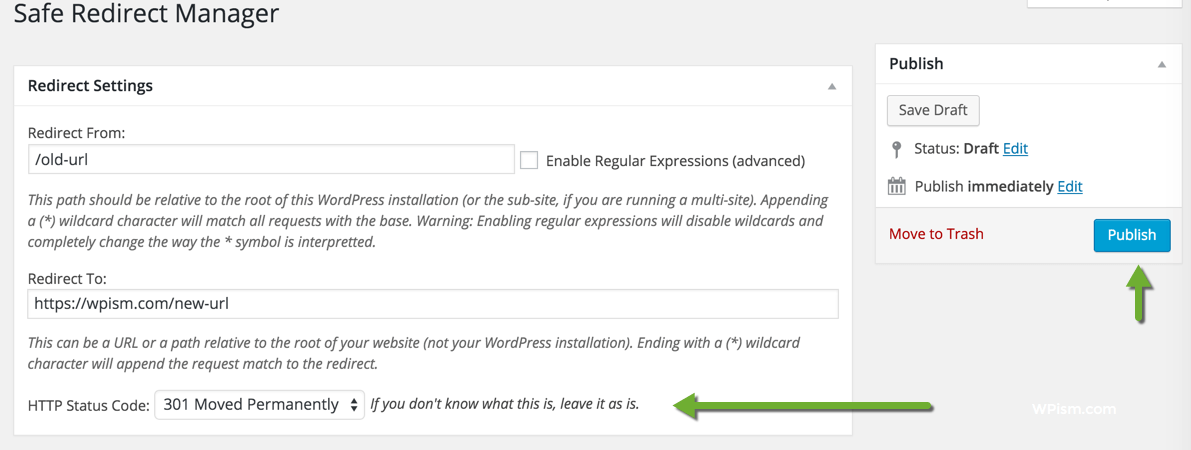
- Hit publish or schedule when you are done.
Unlike other plugins, you can also schedule redirects for later dates, just like scheduled posts with the Safe Redirect Manager.
Although you will only need 301, permanently moved (or sometimes 302, temporarily moved), this plugin gives you several advanced options to add different HTTP Status codes.
Actions in filters make this plugin very extensible, and you can find more development options and guide on the Github repository.
Besides, the plugin is available in multiple languages, including French and Slovak.
6. Yoast SEO plugin – htaccess tool
One final plugin that I want to mention here is the Yoast SEO plugin, which is another immensely popular WordPress SEO plugin. Yoast SEO plugin doesn’t need any introduction, but you might not have realised that the plugin also has some features that can help you with 301 redirects.

Why install more plugins when you can do it with the plugins that you already have? We all want to keep the plugins to a minimum, right?
The Yoast SEO plugin lets you edit your .htaccess file (more on that later), which you can use to add 301 redirects.
Now, I don’t recommend using this if you aren’t comfortable editing .htaccess file. Follow the steps below if you have already installed the Yoast SEO plugin and are comfortable editing the .htaccess file.
- From your WordPress dashboard, go to SEO > Tools, and you should see a list of built-in tools for WordPress (see Image below).
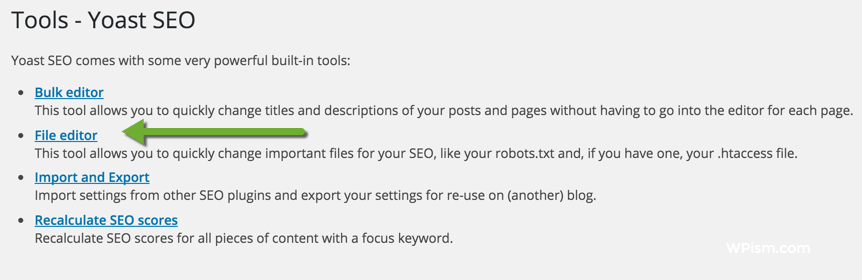
- Click on the File editor tool that lets you edit your .htaccess file.
- Important: Backup your .htaccess file before you make any edits. (In case you mess up your .htaccess file here, you won’t be able to access your WordPress dashboard. You will need to login to your FTP client and correct the syntax or restore the .htaccess file that you have backed up.
- You will see two boxes for Robots.txt file and .htaccess file on this page.
- Add your redirection code (see a sample code in the screenshot for 301 redirections or see the code that you need in the next section) in the .htaccess file box and click on save changes to .htaccess.
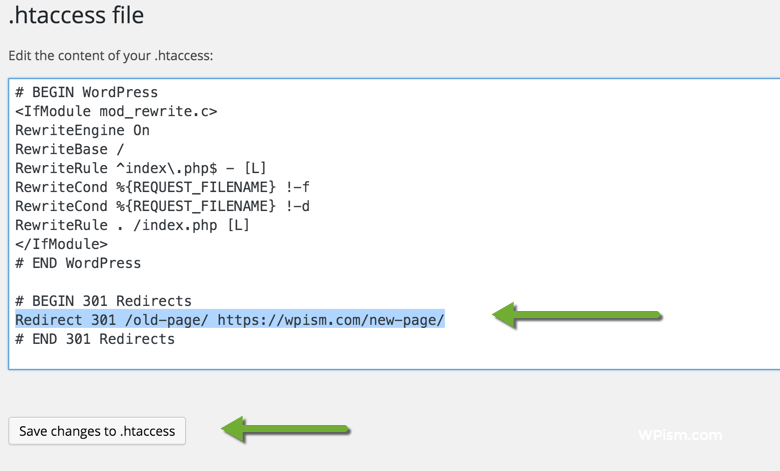
You can also edit your .htaccess file manually to add different kinds of redirection codes, and that’s what we are going to discuss next.
If you have successfully added 301 redirects using plugins, skip to the few other sections in this tutorial to optimise your SEO.
301 Redirects with .htaccess File
You can easily add 301 redirects for a few WordPress posts and pages by using a plugin but what do you do if you are moving your complete website to another domain?
If you are a pro user or depending on your situation, you might need to edit your .htaccess file to add 301 redirects manually.
You will need to have FTP access (username and password) and log in to your server using an FTP client such as Cyberduck or FileZilla.
Once logged in, you should see a .htaccess file in the root of your WordPress installation that should have some information in it already.
Here’s the content of my .htaccess file.
# BEGIN WordPress
<IfModule mod_rewrite.c>
RewriteEngine On
RewriteBase /
RewriteRule ^index\.php$ - [L]
RewriteCond %{REQUEST_FILENAME} !-f
RewriteCond %{REQUEST_FILENAME} !-d
RewriteRule . /index.php [L]
</IfModule>
# END WordPress
https://gist.github.com/pradeepdotco/e85e96451922cbdebec7
This is the code that WordPress adds during installation or when you change the permalink settings.
It’s possible that you might also have some additional code added by some plugins.
And in some cases, you might not have the file at all. Try adding one yourself using the FTP editor. Remember the . at the beginning of the filename (.htaccess). Also, set the permission to 644 as required and recommended for the .htaccess files by WordPress.
301 Redirect Codes
Depending on different situations (whether you are changing just the URL or changing the complete domain), you will need to add different redirection codes in the above .htaccess file.
To remind you again, please back up this file before you make any edits.
Let’s explore some of the situations and codes that you need to add 301 redirections to your .htaccess file.
Redirect Posts/Pages on same domain
Let’s say you have simply changed the permalink (URL) of posts or pages on the same domain. Your previous URL, for example, was /old-post/, and you changed it to /new-post/.
Here’s the code that you will need to add to your .htaccess file.
# BEGIN 301 Redirects
Redirect 301 /old-post/ http://www.yourwebsite.com/new-post/
# END 301 Redirects
https://gist.github.com/pradeepdotco/6cf4d1020897ca3942eb
The second line of the code above is where the magic happens.
You need to specify the redirect type with the Redirect 301 keyword and add your old URL first (/old-post/) and then add the new URL (https://www.yourwebsite.com/new-post/) that you want it to be redirected to. Remember to change the link yourwebsite.com to your own domain name.
If you want to add more redirects, just add below line 2 in the same format. Line 1 and line 3 are simply comments.
Redirect old domain to a new domain
If you are moving your WordPress website to a new domain – For example, your previous domain was olddomain.com, and now you have moved to newdomain.com;
If you want all URLs from the previous domain to point to the new domain, You will need to edit the .htaccess file of your Old domain.
Here’s the code that you will need to add to the .htaccess file of the old domain.
<IfModule mod_rewrite.c>
  RewriteEngine On
  RewriteCond %{HTTP_HOST} ^olddomain\.com$ [OR]
  RewriteCond %{HTTP_HOST} ^www\.olddomain\.com$
  RewriteRule (.*)$ http://www.newdomain.com/$1 [R=301,L]
</IfModule>
https://gist.github.com/pradeepdotco/7a2b6952218e3ace9d10
Obviously, you will need to change the olddomain and newdomain to your own domain names. Also, change the .com extension, if required.
This code also ensures that your posts and pages are redirected to the corresponding post/page on the new domain.
For example, here’s a real .htaccess code that I used to 301 redirect my personal website Pradeep.co to the .com version of Pradeep Singh.
# BEGIN WordPress
<IfModule mod_rewrite.c>
  RewriteEngine On
  RewriteCond %{HTTP_HOST} ^pradeep\.co$ [OR]
  RewriteCond %{HTTP_HOST} ^www\.pradeep\.co$
  RewriteRule (.*)$ https://pradeepsingh.com/$1 [R=301,L]
</IfModule>
# END WordPress
https://gist.github.com/pradeepdotco/d53a4bb5d3f75bb59813
If your websites are on HTTPS, please don’t remove the other code from the .htaccess file required for SSL. And remember to add https to the new domain as in the above example.
301 Redirects after Moving to HTTPS / Adding SSL
If you have recently moved from HTTP to HTTPS or added SSL to your website, you will need to 301 redirect all your HTTP traffic to HTTPS.
Apache
Add the following 301 redirection code to your .htaccess file and your visitors will be automatically redirected to the HTTPS version of your website.
RewriteEngine On
RewriteCond %{HTTPS} off
RewriteRule ^(.*)$ https://%{HTTP_HOST}%{REQUEST_URI} [L,R=301]
https://gist.github.com/pradeepdotco/d6f599b4375520bb5dc678cbaf012c94
You might already have the line 1 – RewriteEngine On if you have an existing .htaccess file. Just make sure the line 2 and 3 of the above code follow your existing RewriteEngine On line.
NGINX
Add the following code to your Nginx config.
server {
listen 80;
server_name domain.com www.domain.com;
return 301 https://domain.com$request_uri;
}
https://gist.github.com/pradeepdotco/c7aeafdce4bbb8bdaacd9a5edecefabc
You can also use WordPress plugins like Really Simple SSL that redirects all incoming requests on your website to the HTTPS version.
SEO after 301 Redirects
Now that you have added 301 redirects either manually or using the plugins, you are all good to keep the SEO rank juice flowing to the new URL.
If you only redirected a few posts and pages on the same domain, there’s nothing much you need to do. Your new URLs will soon be seen on the search engine results page (SERP).
However, if you added 301 redirects after moving to an entirely new domain, there’s one more step that I would recommend for SEO purposes.
Domain Change in Google Search Console
Although Google is smart enough to pick up the changes itself, you can make its job easier by notifying yourself and speeding up the process.
Follow this complete guide on changing websites address in Google Search Console for all steps but here’s a quick overview.
If you are concerned about SEO, I assume you already use the Google Webmasters tool – Search Console. (If not, sign in with your Gmail address and add/verify your sites).
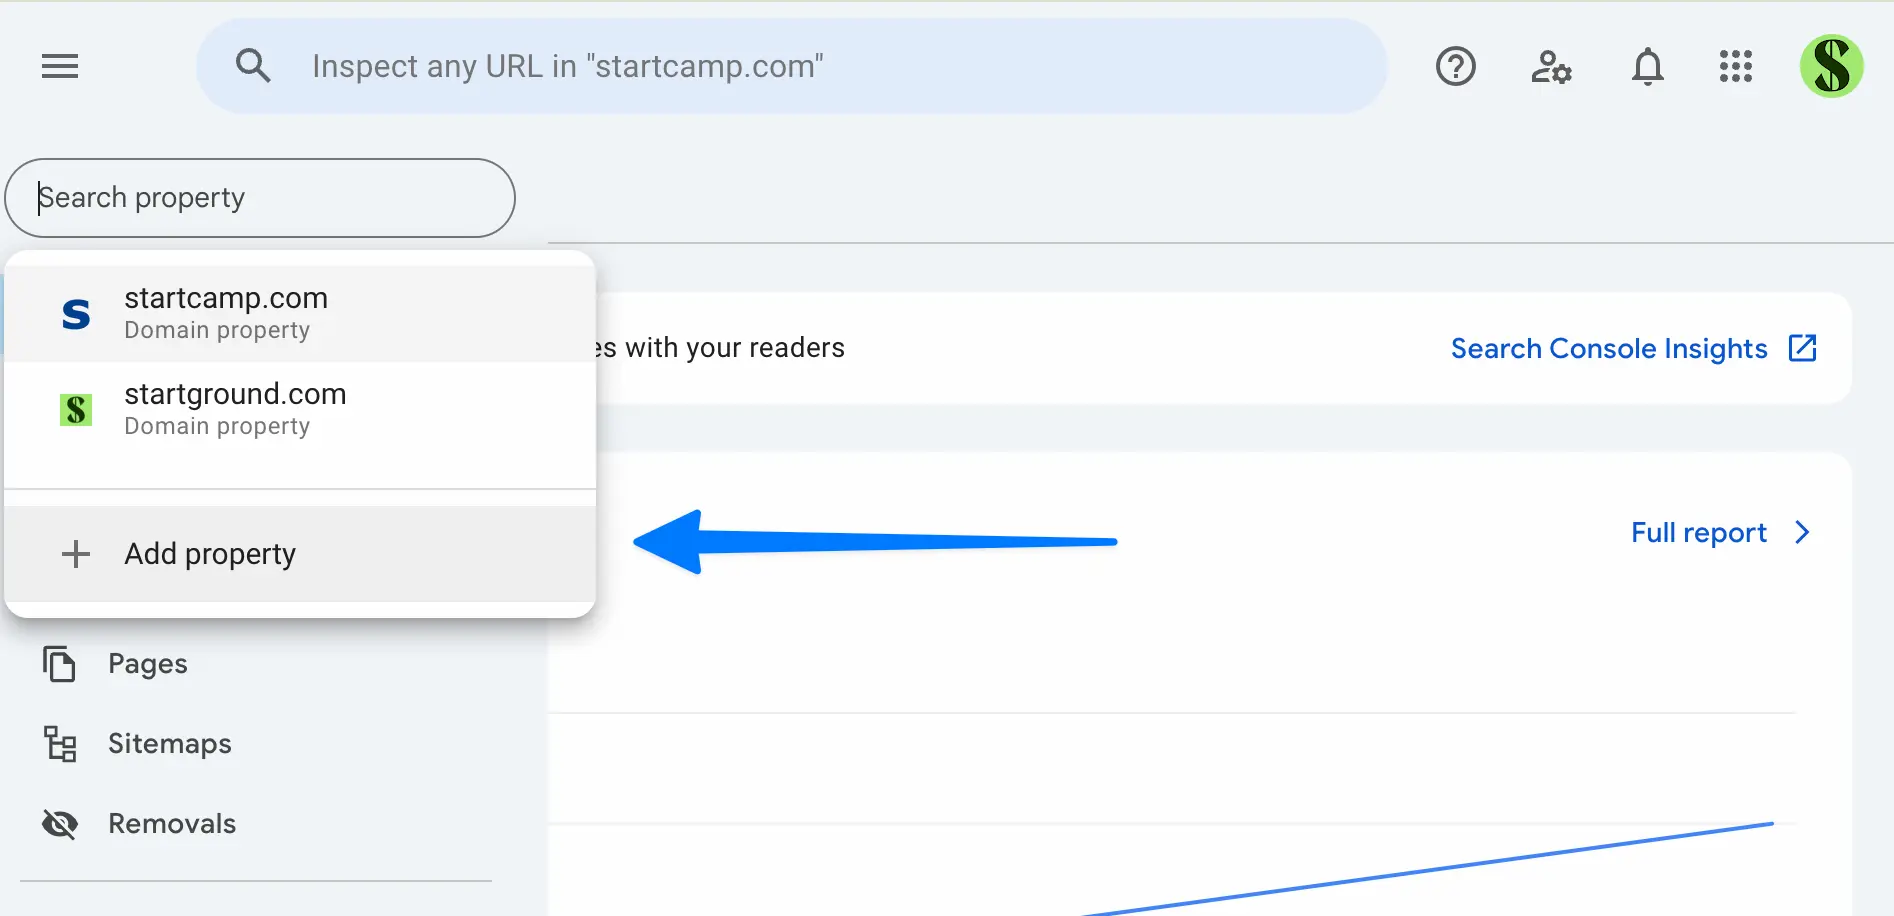
You need to have both of your domains (the domain before 301 redirections and the new domain) verified in the Google search console. Click on “Add a Property” if you need to add and verify the new website.
Steps to Submit Change of Domain
- When logged into Search Console, click on the old domain that you want to move away from.
- From the dashboard, click on the settings Icon.
- You will now need to select the “Change of Address Option from the list.
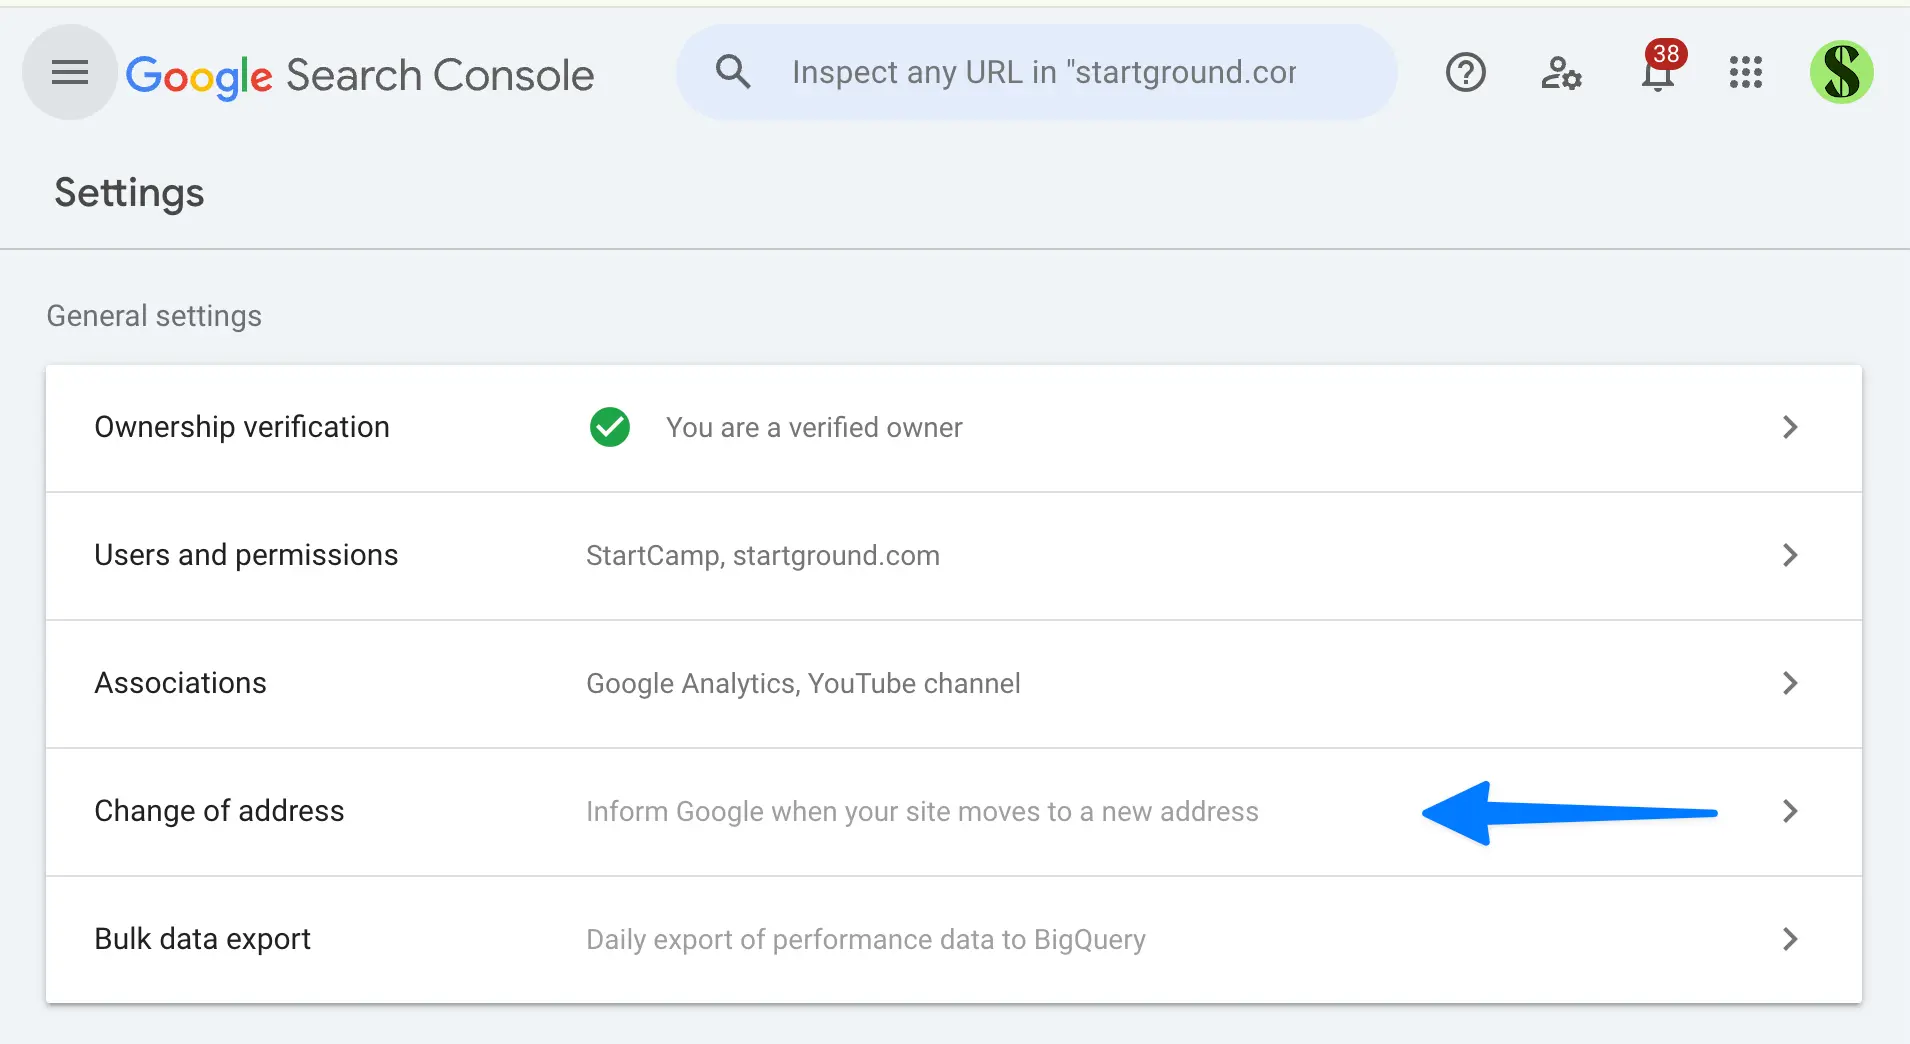
- Select the new website from the list.
- You can now confirm if the 301 redirects that you added (using the codes above) are working properly in the second step.
- You will need to have both domains verified even after the 301 redirects.
- Click on Submit, and you have successfully notified Google of the change.
Note: You might not pass step immediately after adding the htaccess redirection code, but try it again after a day or so, and you should be able to confirm all the steps.
It will take a few days for you to see the changes in SERP. Be patient and keep monitoring your index status and traffic for a new domain within the search console.
How long should the 301 Redirects be Active?
This is one of the common questions after someone goes through this redirection process. It depends on several factors, such as the traffic that you receive for old links and the number of incoming links from other websites to your old domain posts.
Although there’s no official timeline, many SEO experts recommend keeping the 301 redirects active for at least a year. Google could take from 6 months to a year to fully recognise that the site has moved. Google’s John Mueller, in a hangout session, has also suggested (watch at 26:18 mark) aiming to keep the links active for at least a year.
Finally, for those who keep on changing domains and have multiple 301 redirects, here’s a video from Matt Cutts of Google that I recommend watching for best practices.
Implement 301 Redirects in WordPress
To sum up, 301 redirects are really essential and the right thing to do from both the user’s and search engine’s perspectives. You don’t want to lose the existing traffic and SEO rankings that you have built over time. And at the same time, you want to help your visitors by pointing them to the right URL or domain.
I hope you are now able to add simple 301 redirects while maintaining all your traffic and SEO aspects.
Subscribe to this blog if you found this tutorial helpful, and as always, leave a comment below if you need help with anything.
- August 2016 Update: Google has made some official announcements for new rules of 301, 302 redirects. Follow our latest post about 301 redirects and effect on PageRank to know more about the recent developments.
As we discussed, several highly rated 301 redirect WordPress plugins make it really easy to add 301 redirects. You can also add the code manually for htaccess 301 redirects.
